Showing posts with label tutorials. Show all posts

Thursday, September 29, 2016

Fun with Stencils.....{MCT Tutorial Thursday}

Good Morning everyone and welcome to another
My Creative Time Tutorial Thursday!!!
I shared a card  here on Monday for MCT's Manly Monday post showing a fun technique using handmade stencils with MCT dies.
I promised to share a tutorial on how I made that card but instead of reproducing that card, I used the same technique and made 2 different mini cards....
Take a look at my finished projects...
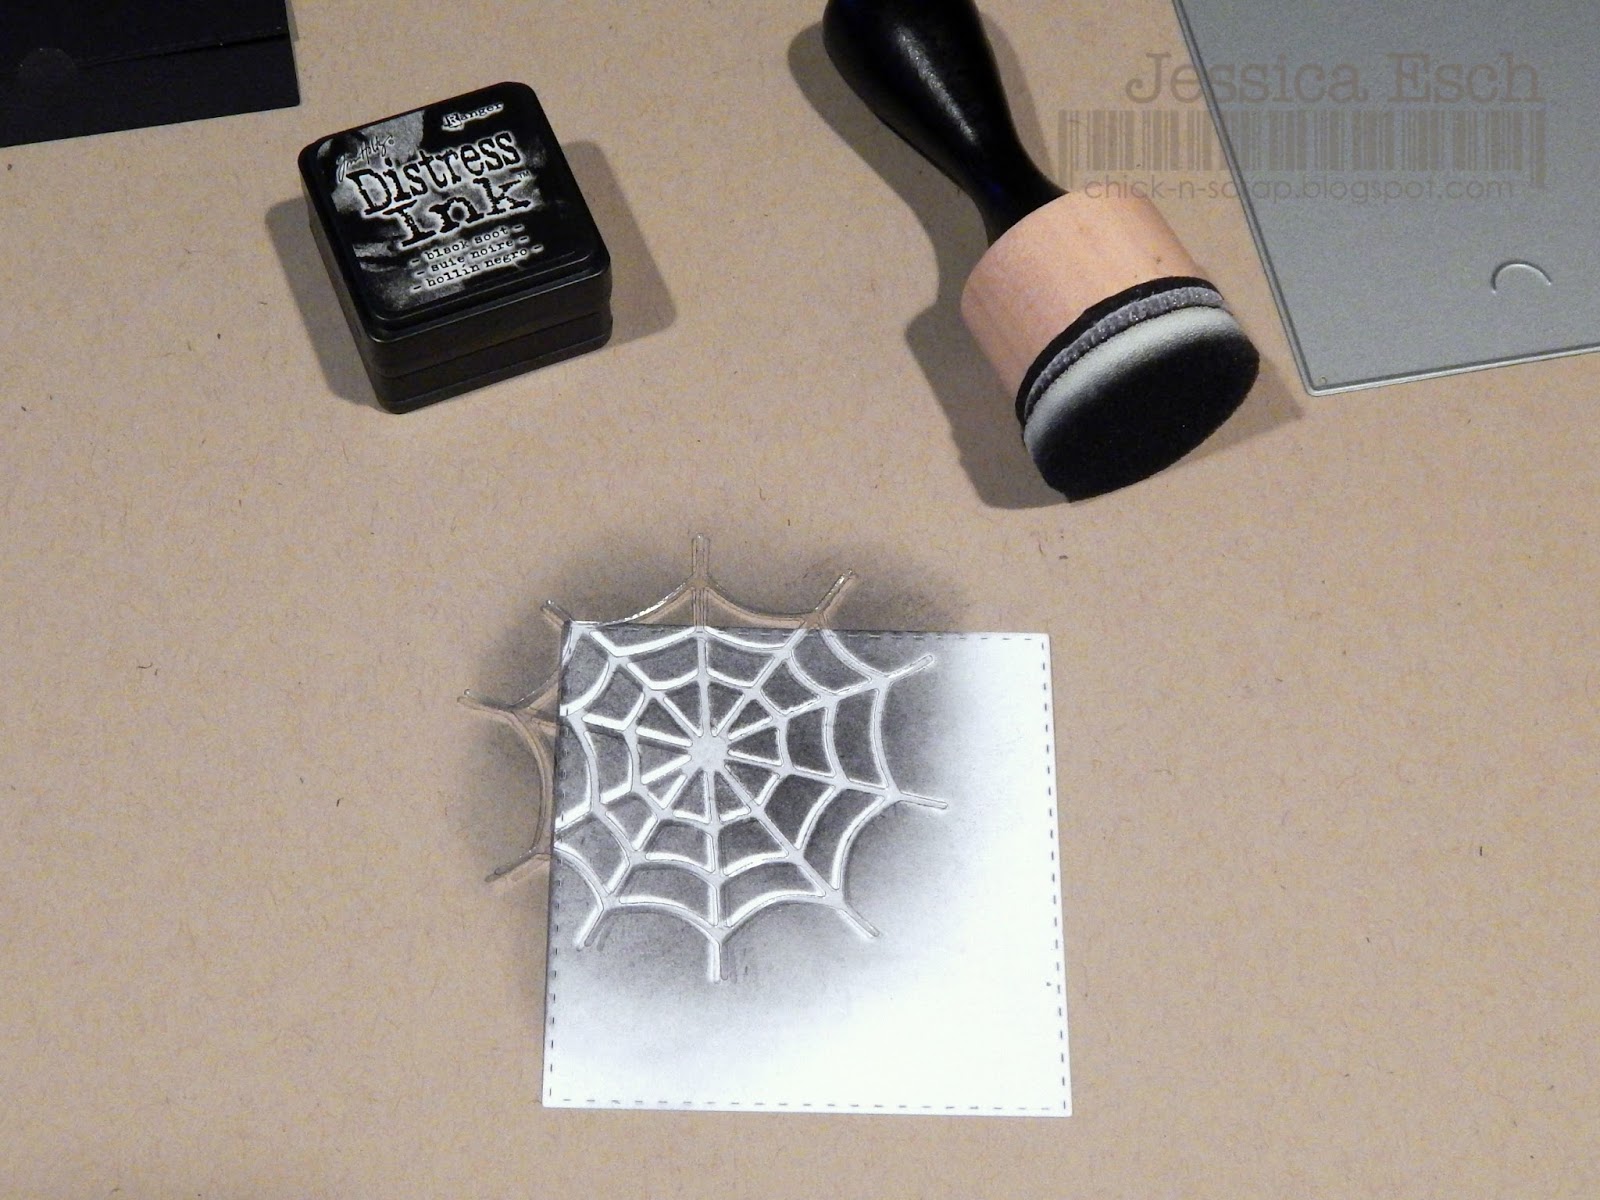
And here is how I made the black and white spider web mini!
I gathered my supplies~ 
and Black Soot Distress Ink
I die cut the spider web out onto a piece of acetate. Loving the details that this die has it makes for a perfect stencil!
Using my ink blending tool and holding onto the stencil, I dabbed and blended and rubbed the tool over the stencil, starting from the center and working out until I got the right look I was going for.  As I blended out I let the ink lighten which gives it the look of a spray painted piece
Once the stencil was pulled off giving the desired look, I re-positioned it onto the other corner and inked it up the exact same way.
To finish my mini card, I stamped my sentiment, added that cutie spider and attached the whole white panel to the front of my Just a Note die cut.
~~~~~~~~~~~~~~~~~~~~~~~~~~~
I did the same technique for my pumpkin card, just changing up the die stencil to use the pumpkin and leaf from the Gobble Gobble set
 Adding  Carved Pumpkin and Mowed Lawn Distress ink
and a bit of  Gathered Twigs Distress ink as well!
When I went to add color for the leaf, I used the actual pumpkin die, the inside of my stencil to cover up the pumpkin so I could contain where the Mowed Lawn Distress Ink went. I wanted to add the color only to the leaf part~not the stem and I didnt want it to over lap the pumpkin
I add the panel to the Just a Note die, stamped my sentiment, and my mini was complete!!
The best part of making these stencils~ you can use them over and over again!!!!
Well I hope you have enjoyed my tutorial and will give this technique a try!

 Want to see more projects?
Make sure you head on over to My Creative Time to see what the rest of the DT made!
I know the inspiration is AWESOME!!!!

Thanks so much for stopping by and have a GREAT day!!

Thursday, April 30, 2015

MCT Tutorial Thursday.....{Making Your Own Stencils using Dies}

Good Morning everyone and welcome to a new feature on the My Creative Time blog! 
This one is Tutorial Thursday~ where the DT will share video or written tutorials using MCT stamps and dies!
Remember this card I made for the "Trending Now~Stencil it" post? Well I had some questions regarding how I made my stencil so I thought I would share a very easy written tutorial and another card using a homemade stencil.
Here is the new card I made using some of the newest releases......
Gold is HOT right now and I just LOVE the new sentiment from the You're My Hero Stamp set so I made a new stencil using 2 of the new star dies and did some heat embossing too. 
Here is how I did this...
I start out with a piece of acetate that I get at the Office Supply store. I actually go to the copy department and buy the sheets individually, they maybe cost $0.20 each...really cheap. I cut a piece down to about 5 1/2 x 6 1/2 so it can easily be placed over a standard A2 size card. Next I pulled out 2 of the new Bunch of Stitched Stars dies and arranged them onto my acetate. Making no specific pattern I die cut the stars and repeat until I get the pattern I want.

Here you can see my acetate laying on top of my card mat. Since the mat is the smallest of the Stitched Rectangular Frame Dies, you can see that the stencil lays over the actual cardstock. That is fine, I can save this stencil and use it over and over again :) Next I taped the stencil down over my cardstock to begin the inking and embossing part. Using my Versamark ink I tapped it on top of the stencil making sure to really cover the entire open stencil part. Since the ink will rub of the stencil I didnt worry about ruining that...I just wanted the best coverage for my embossing. Next I pulled the stencil off and covered the cardstock with some gold embossing powder. Heated it up and I have a beautiful embossed background using MCT dies!

Next for the sentiment, I used the circle cut out from the Surprise Pop-Out Card Die to stamp my sentiment onto. Now for this part I have had some questions about this too...adding thread to cards. Here is what the backside of my thread nest looks like. Nothing pretty but flip it over and it adds so much added details to a card :)

My Creative Time Products Used:
Surprise Pop-Out Card Die

Additional Products Used:
Acetate
Gold Embossing Powder
Gold thread
Fun Foam
Black, White and Gold cardstock

So what did you think of my card? 
You should really go through all your MCT dies and make some of your own stencils. The possibilities are endless and oh so much fun!!!

Make sure you head on over to My Creative Time to see what the rest of the DT made!
I know the inspiration is AWESOME!!!!
Thanks so much for stopping by and have a GREAT Thursday!!!


Wednesday, November 12, 2014

Peachy Keen Stamps Tutorial....Salt Dough Ornaments

Good Morning Everyone!!!
I am up on the Peachy Keen Stamps blog today with a tutorial I did with my son Parker on how to make Salt Dough Ornaments using your Peachy Keen Stamps.
For all the directions and TONS of pictures please stop by the blog to check it out!!!
 Our projects are super fun to do and make GREAT gifts for the kids to give to their teachers, neighbors and grandparents!!!
All the details and a complete list of supplies we used are listed on the PKS blog as well!!!
I will see you over there :)

Don's miss out on this AWESOME sale too!!!!
40% off everything in the store plus 99 cent shipping!!!!

~~~~~~~~
There are AWESOME November specials as well!
I used 2 for this project~
PK-416 Lorie and Al Gingerbread Set
and

PK-412 Too Sweet to Eat

Can you say CUTENESS?!?!?!

Wednesday, July 23, 2014

SVG vs Pieceables...{PKS Tutorial}

Good morning everyone!
I am on the Peachy Keen Stamps blog today with a tutorial on using 
Peachy Keen Stamps SVG'S and the new Peachy Keen Stamps Pieceables!
~ SVG~

~Pieceable~

You are probably thinking....well we know the difference just by looking at your pictures.
And I am sure you are right BUT we have had several people ask questions since the new pieceables were released last week, so I am hoping that all your questions are answered with this post....check it out over on the blog HERE
 I would love to see what you think of my tutorial....
Comments make me happy :)

Thanks for stopping by today and have a GREAT hump day!

Wednesday, April 30, 2014

Peachy Keen Stamps Tutorial

Good morning everyone!

I am up on the Peachy Keen Stamps blog today with a picture tutorial on how I added these adorable faces to my projects...
 
You are probably thinking....well you just stamped them right?
Nope...Both of these projects used stamps that have additional parts of the image so I used some washi tape and..well the rest you will have to check out over on the blog HERE

Hop on over and I would love to see what you think....
Comments make me happy :)

Thanks for stopping by today and have a GREAT hump day!


Wednesday, May 22, 2013

Teacher Appreciation Post-it Note Tutorial..........{The Kraft Journal}


Good Morning!!
 I am up on The Kraft Journal's Blog today with a  great end of the school year Teacher Appreciation gift idea and tutorial. Last year I made this altered coaster Post-it note holder (see original HERE)  and have had many requests to share how I made it.  Since the end of the school year is quickly approaching for many, we all have those special teacher's we like to do a little extra  for so hopefully you will be inspired to create one of these as well.
Here are the supplies you need.....
The supply list is quite simple and can be altered to fit whatever theme you choose. 
Coaster or Chipboard
designer paper
stamp and stamp block
ink
adhesive

So let's begin! 
Start by taking your chipboard piece (4in x4in) or coaster and cover it with the Brown Kraft Cardstock using any adhesive of your choice. My go to is the Tombo Mono Multi Liquid and after I glue the card stock to the coaster I smooth all the air bubbles out with my bone folder
I also ended up using a file to smooth the edges around the coaster as well. You want a nice finished look both on the front and the back of the coaster. Plus if you are using chipboard, the added cardstock makes the whole piece sturdier.
This next step can be done however you choose and can be as detailed as you want. I choose to use my designer paper, some Black Twill Tape and my sewing machine. I quickly ran the ribbon and designer paper through my sewing machine using a zig zag stitch and then followed the same steps as above to attach it to my base.
Now to finish your project off...all you have to do is stamp your sentiment onto the post it notes...yes depending on how many sheets of paper you are stamping on it can get pretty tedious but the receiver would love to have all the pages be consistent~ don't you think?? I used The Alley Way Stamps~ Trees Company stamp set for both the sentiment and that adorable apple. I also hot glued the Hinge Clip to my coaster base, further embellished with a button from my stash and some Natural Hemp Cord

So there you have it...What do you think???
I know exactly who will be getting this and sure hope she likes it!!
Thanks so much for stopping by and have a GREAT Wedneday!

Wednesday, April 24, 2013

Personalizing Your Cards w/ Labels...{The Kraft Journal Tutorial}

Good Morning Everyone!
It is my day over at The Kraft Journal for the "Watch Me Wednesday" tutorial. 
I am sure there are many of you out there that make these beautiful cards and projects to sell. Like myself,you may not own a personalized stamp with your name and blog information to stamp the back of your cards before selling them or giving them away. I have a GREAT way to help with that..so sit back and enjoy :)

The Kraft Outlet sell the best Brown Kraft Lables in a variety of sizes and shapes to fit all your needs. But for my tutorial (and the labels I like to use the best for my cards) I will be using the Address Brown Kraft Lables. They come 30 to a sheet, have the nice rounded edges and are compatible with your inkjet and laser printers. Plus they are very inexpensive and do not have to be used the way I use them, make them your regular mail return address label or use them to organize your craft room. The possibilities are endless.
These are what the labels look like, I removed the outer kraft border so you could see them a bit better. Using my printer and the Avery Template #8160, I enter the information I want each of my labels to say. You can enter anything you wish but for my cards I like the labels to read
designed by~ my name
blog address 
email address
That way if someone receives one of my cards and wants to order more or see what else I make they have all the information needed to contact me.
And here is what they look like all printed out. Again you can customize your label to say whatever you would like.

My finished label, attached to the clear packaging envelope I use to protect my card. They stick very well so there is no worry about them coming off. Plus they give your card a professional look, don't you think?
Well that is all I have for you.....I do hope you have enjoyed my tutorial.
Thanks so much for stopping by and have a GREAT day!!

Tuesday, April 24, 2012

Picture Tutorial on Making Tag Hearts~ Creative Inspirations Paint


Good Morning !!
On Sunday, Creative Inspirations Paint kicked of the next Inspired by Challenge.
This weeks challenge is 
Inspired By: Tags
and
the challenge is to make any project with a tag
so
I posted this tag
I received quite a few comments regarding how I made the hearts and I thought I would walk you through 
with a picture tutorial.

So here we go...
I started out with these fun chipboard pieces that I picked up at Michael's from the $1 bin
Colleen, another CIP DT member also made a project using these chipboard pieces which can be seen 


Next I choose the color of Creative Inspirations Paint I was going to work with.
Antique Silver, Blush, Evergreen and Tanzanite in this tutorial

Such a cool color combo I think...remember any colors will work :)

Using my paint brush I dabbed the color on.....so not paint them on.
You want the look of tie dyed, or splattered rather than a smooth coat
Don't be afraid to mix it up!
If there is not enough of one color, add more paint.
The more you play the different the end result will be

This is where my original project turned...
I was being very impatient waiting for the paint to dry so I took out my heat gun
and heated the hearts to quick dry them...
instead of just drying them...

the heat gun made the paint bubble giving the hearts even more texture and a splattered look.
Not the idea I was shooting for originally but so happy with how they ended up turning out.
Not only can you see the texture from the original unpainted embossed hearts, but the paint created a texture as well from being heated.

Now these hearts are ready for another project!!

I hope you have enjoyed my tutorial
and I would love to see you give this a try!!
Also would love to see you create a project for our challenge!!
All the details can be found 
Thanks again for stopping by and have a great day!

~~~~~~~~~~~~~~~~~~~~~~~~~~~~~~~
Entering this into the following Challenges:
Top Tip Tuesday~ Anything But a Card