Thursday, October 30, 2014

Creeping By To Say Hi!...{MCT Thrifty Thursday}

Good morning everyone and welcome to another
My Creative Time's ~Thrifty Thursday.
A day set aside to share any type of project using our scraps/leftovers or recycling items as well as using My Creative Time stamps and dies!

For my project today, I used a scrap of designer paper that I die cut a circle into for another project and ended up scratching that idea and that awesome spider web and spider I had left over from my last Halloween card I made. My process of making cards always changes, so I end up cutting out several pieces, playing around with my design and then placing whatever cuts I don't use into a container for another time. I then can take this opportunity~ Thrifty Thursday~ to use some of those cuts.

Here is the card I made. A fun shaker card and I really love the way it turned out! Super cute and so not spooky cause let me tell you...I HATE spiders...LOL!
Like I said up top, I had this gray and white polka dot paper from Lawn Fawn that I had cut to size and die cut with a circle from the Bunch of Fun Circle Dies and then ended up not using it. I knew it was going to be a shaker card~I had already put the acetate on the back, but placed it aside for another project. Tada...that is today :)
Before filling my card with sequins, I stamped my sentiment using the Trick or Treat stamp set and then filled it with purple and orange sequins. Big circle...LOTS of colorful sequins!
Then I used a extra spider web and spider I had cut out from the Wicked Fun Dies set and glued it to the front of my card. I added glossy accents to the spider to make him look more dimensional and then attached him to the web hanging from a sequin.
Some random additional sequins and my card was complete.

My Creative Time Products Used:
Bunch of Fun Circle Dies
Wicked Fun Dies
Trick or Treat

Other Products Used:
Sequins
glossy accents
Lawn Fawn~ Lets Polka designer paper
foam pop dots

What do you think of my card?? I love using up scraps that would otherwise pile up and get forgotten about! And shaker cards are so fun to make! If you have not tried one yet you really should! 
Make sure you head on over to My Creative Time to see what the rest of the DT made!
I know the inspiration is AWESOME!!!!

Friday, October 24, 2014

MCT 37th New Release Blog Hop

Good Morning 
and 
Welcome to the much anticipated 
37th New Release from My Creative Time!

This week has been so much fun with the DT sharing amazing projects and inspiration! But we have one more day of AWESOME~NESS! 

Now you should be coming from the VERY talented
but if you are just stopping in, make sure to head back to the start~ the AMAZING 
You are not going to want to miss a thing! She really ROCKED this release (well she always does, doesn't she?? Of course!!)

Today I get to showcase the
 Seasonal Greetings and Whimsical Trees sets
I have 3 projects to share so lets get started...
For my first card I went CAS so I could focus on the AWESOME new stamps and dies from both sets. I made a fun embellishment using the oval dies from the new Seasonal Greetings set to make a pumpkin. I stamped each of the ovals with the coordinating stamp from the Whimsical Trees set. It gives them such a great little extra don't you think???
Then for the stem, I used the truck of the tree die for the evergreen. It is a PERFECT size! I also added a leaf using the smallest from the Stitched Leaves Dies and tucked it in between the popped up top layer of my pumpkin. An added hemp twine bow and my embellishment piece was completed. To finish off my card, I stamped the sentiment from the Seasonal Greetings set and added 2 enamel dots. 
~~~~~~~~~~~~~~~
For my next card, I switched seasons and went for a wintery theme which unfortunately will be in my neck of the woods really soon :( 
I just LOVE the new tree dies from the Seasonal Greetings set! I cut this evergreen out using white cardstock and then glittered it up using diamond stickles. I then popped it up on top of the tree truck but before I did that, I went about putting the card mat together. I layered my card base of kraft with some white cardstock and then designer paper from Echo Park~Winter Park using the largest of the Stitched Rectangular Frame Dies & More. I used the same die to make a smaller piece with matching designer paper and then added a decorative border in white cardstock using one of the Fun Stitched Edges dies. For the sentiment, I stamped it onto the card front, and instead of using it side by side (which is how it was designed) I stamped the "Winter" first and then stamped the "Wonderland" below it. Taping off the sentiment I did not want to stamp so I could get the stacked look instead.
Here is another picture of the tree popped up, the beautiful script of the sentiment and the added enamel dots that I used to finish my card off with.
~~~~~~~~~~~~~~~~~
For my final project I made a Christmas treat that would be perfect to hand out to the teachers for the holidays.
I again used the Evergreen die from the new Seasonal Greetings set and added it to the top of my Treat Slider Box. I filled the box with some covered Hersey nuggets and then wrapped it with some Totally White Trendy Twine. I added a fun sparkly button and my stamped sentiment. I used the Vintage Stitched Label Die and the sentiment from the Seasonal Greetings set. The banner was then tucked underneath the button and secured with some foam pop dots. This was super easy to put together and would be super easy to mass produce. Especially if you have several teachers to give gifts too. I know each of my boys have 8. That's alot of holiday gifts which could get  VERY costly. These are fun, sweet (because everyone loves chocolate right??) and make a GREAT holiday gift!
So there are all of my inspiration projects!
Now for all the good stuff.....

"FREEBIE STAMP"
****UPDATE ON FREEBIE STAMP SET!!!!!****
Hello my sweet friends! Okay, the first 150 shoppers have already came thru! For those invoice numbers 13533 thru 13683, you are the LUCKY ones that will be getting this ADORABLE "Christmas Doggy" in your pkgs! If you missed out on this cutie patootie FREEBIE, it is available for purchase here


***BLOG HOP GIVEAWAY***
For our blog hop giveaway, Emma is giving away a $50 gift card to the "My Creative Time" store to ONE LUCKY winner! ALL you have to do is leave a comment on each of our blogs! You are NOT required to comment on EVERY SINGLE blog, but the more you comment on, the better chance you have for winning! VERY IMPORTANT, PLEASE leave a way for us to contact you w/your comment just in case "YOU" are the lucky winner! 

***SALE ALERT***
ALSO, DON'T FORGET our sale starts RIGHT NOW! Use the code: OCT2014 to receive 20% off your entire purchase! This sale applies to "IN-STOCK" items ONLY. This sale will end on Friday, October 31, 2014 @midnight PST.

And here is the whole release!


BLOG HOP LINE UP
Brigit - http://www.brigitsscraps.com

Well your time with me is up... your next stop along the hop is the super sweet and very talented
Stacey
Thanks so much for hopping along with us and have a GREAT Friday!!!

Thursday, October 23, 2014

To My Lil' Pumpkin...{Trendy Twine DT Project}

Good Morning everyone! 
It is my DT day over on the Trendy Twine Blog and
For my project today I followed the current Trendy Twine Challenge going on right now
and made some adorable pumpkin treats.

The challenge is....
Boo-tiful Treats recipe:
Halloween treat packaging with a tag
Trendy Twine**

And here are my lil' pumpkins!
 Aren't they just ADORABLE????? I just love them to pieces!!!!
 Here is how I made these.... I used a file I bought in the Silhouette Store called the 3d Pumpkin Petal Box and re~sized it  to make them mini...These measuring about 2". Once all the pieces were cut out, the box and the stem, I stamped onto the front my PK face, PK~550 Pumpkin Faces. I added some big pink cheeks and some white gel pen doodles and placed these aside to work on the tags.
For my tags, I used the die and stamp set from MCT, Teeny Tag Dies and Teenie Tag Holidays. I stamped it onto some white cardstock and for some added color to top of the box I die cut a leaf in the same green color as the twine using the MCT Stitched Leaves Dies. To put the tag onto the box, I wrapped some Lime Orangesicle Trendy Twine around the closed box on the stem. A sweet bow and the ends tied and my boxes are ready to give to my Lil' Pumpkins.
Isn't this twine color AWESOME? I just LOVE the ones with the added white twist. In my opinion this is one of the MUST have for all of your fall projects! Remember Thanksgiving is coming up and this would look super on all those projects as well!
Halloween Lime Orangesicle Trendy Twine - Green, White, Orange


So there is my inspiration project! I sure hope you will join us in this month's challenge! You have 1 more day to great crafty and enter to win!
**Trendy Twine is a brand of twine, not bakers twine in general.
If you do not have Trendy Twine, use hemp, jute, 
embroidery thread, or yarn only; ribbon does not count.
(no other brands of bakers twine)
Deadline is: 11:59 pm, Fri., Oct. 24th.
-Project must be new for the challenge.
-No back linking.
-Only one entry, please.
-Must follow directions for the challenge.
-Mention the challenge in your post.
Projects not qualified will be unlinked without notice.
(including wrong twine)

Before I say goodbye for today, make sure to stop by and have a look at the gorgeous twine and so many other fun items in the store HERE
While you are there make sure to look at all the gorgeous Halloween twine colors!!! There are tons of specials on all the mini sets.....
PLUS 
all the full rolls are on sale as well...


New to Trendy Twine??? Check out the other places where we share our projects .....
Trendy Twine Blog~ HERE
and the
Trendy Twine Facebook page~ HERE
Don't forget to visit the 
new and improved, packed with tons of product
Store HERE

Thanks so much for stopping by.
I hope you have enjoyed my project and have a great Thursday!

Wednesday, October 22, 2014

MCT 37th New Release Sneak Day 3

Good Morning and welcome to Day 3 of sneaks for the new
My Creative Time 37th  Release!

Another AWESOME day of projects to share and more FUN new stamps and dies! Such a GREAT release and I know you are all LOVING it so far :)


Today the DT will be showcasing projects using the new set~
Winter Cheer


For today's inspiration I made a shaker card using one of the new dies and one if the matching sentiments.......
Aren't those new ice skate dies AWESOME?????  LOVE them :)
So here is how I made my card.... I started with a kraft cardstock base and added a layer of blue cardstock and another layer of designer paper that was die cut using the large Stitched Rectangular Frame. Next I die cut the frame from the Just Simply Live set and made a shaker using some seed bead in white and blue. Before assembling the shaker, I did stamp my sentiment from the new Winter Cheer stamp set. I also die cut the skates and wrapped the laces die through the frame of the shaker so it looks like it is hanging on the frame. I popped the whole piece onto the card using foam pop dots for lots of added dimension.
Here is another angle of the skates and sentiment. I did add some blue stickles to the pom poms on the skates as well as placed some enamel dots around the frame.
A bit of embossing on the shaker inside using a fun snowflake folder for sure added to the overall feel of this card.

My Creative Time Products Used:
Winter Cheer (Sneak)

***Sneak Peek giveaway!***
We will be giving away the sets we are showcasing each day to ONE lucky winner! For example, the set we are showcasing on Wednesday, Emma will announce the winner of that on Thursday & the sets we are showcasing on Thursday, Emma will announce that winner on Friday in her video!
ALL you have to do is leave a comment on each of our blogs! 
You are NOT required to comment on EVERY SINGLE blog, but the more you comment on, the better chance you have for winning! VERY IMPORTANT, PLEASE leave a way for us to contact you w/your comment just in case "YOU" are the lucky winner! 
For EXTRA entries, you can spread the word about this release on Facebook, tweet about it OR even instagram it! #mycreativetime!
GOOD LUCK EVERYONE & let's start spreading the word!;)


Thanks so much for stopping by today and I will see you all back here tomorrow for day 4!
Make sure to check out the rest of the AMAZING inspiration! You can see it all over on the My Creative Time blog!


Tuesday, October 21, 2014

MCT 37th New Release Sneak Day 2

Good Morning and welcome to Day 2 of sneaks for the new
My Creative Time 37th  Release!
So what did you think of yesterday's projects?? Pretty AWESOME right???
Well we have so much more to share so lets get right to it!

Today the DT will be showcasing projects using the new set~
Boughs of Holly
For today's sneaks I have 2 projects to share...a fun card and some very easy tags...
First up, my card......
I just LOVE Christmas time and I when I saw the new stamps and dies in this set, I couldn't wait to use them!
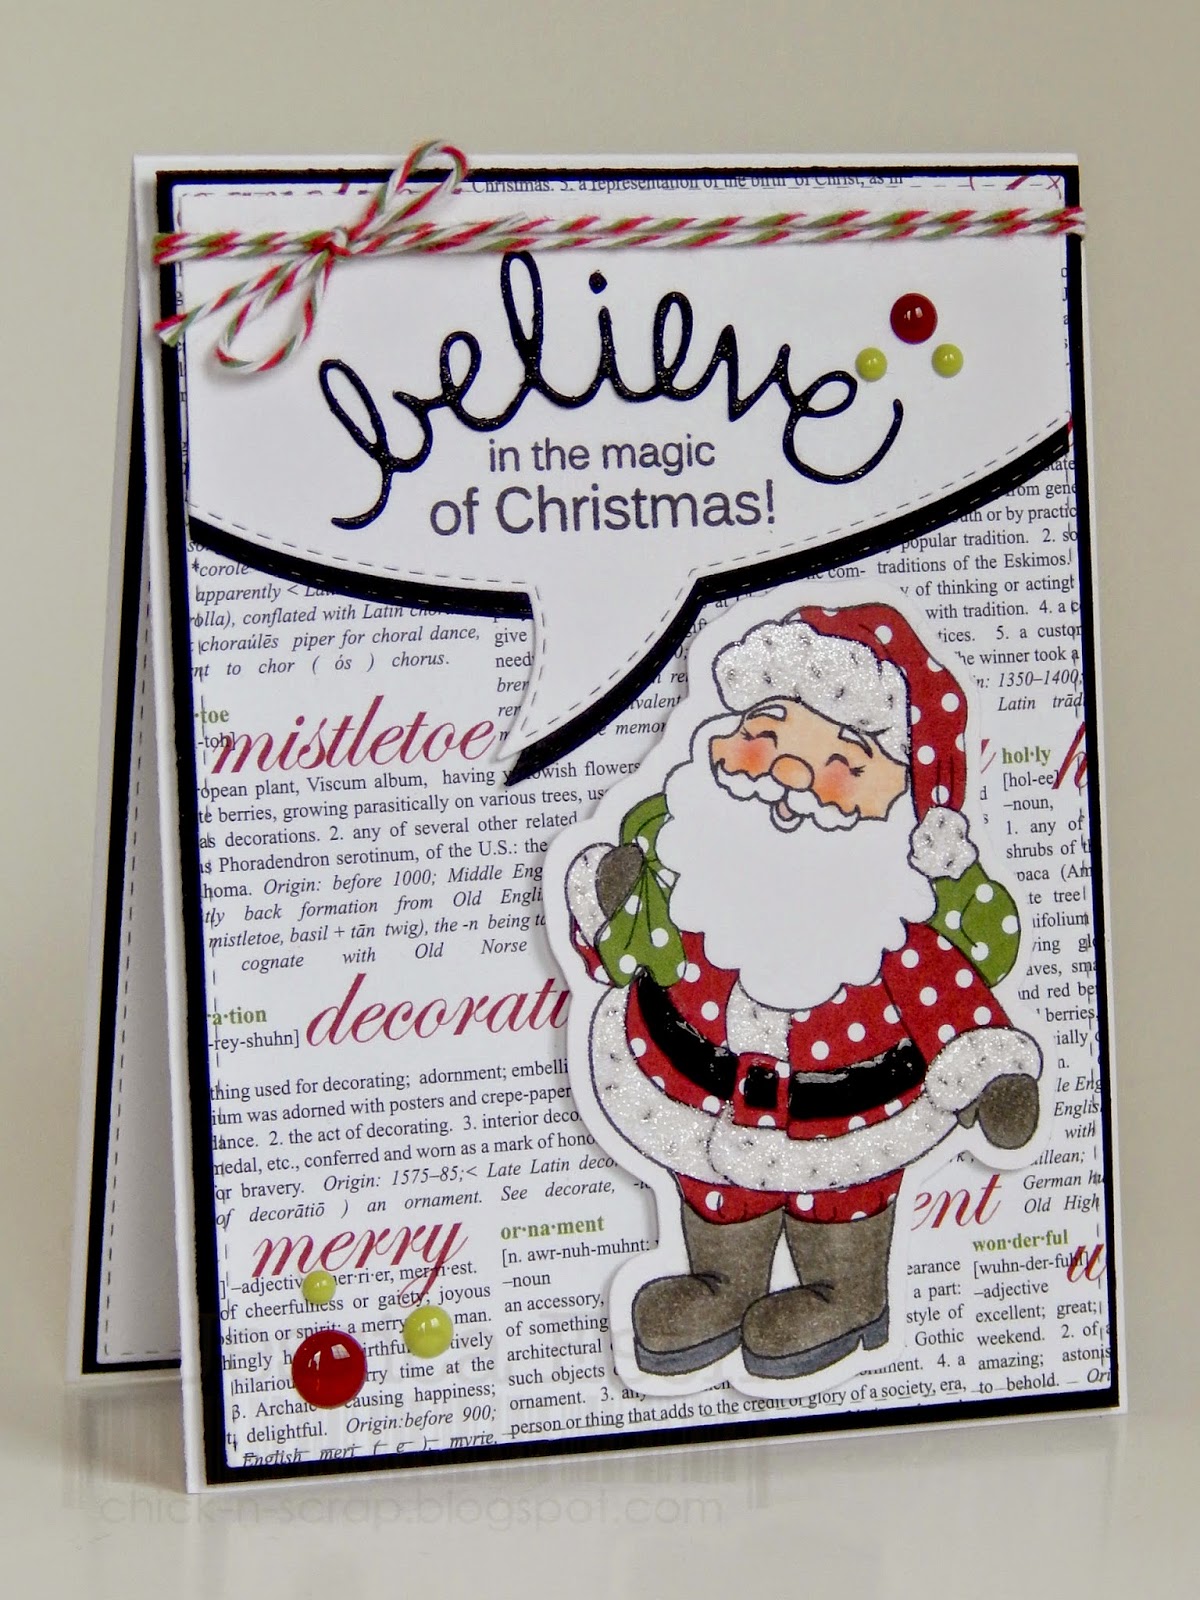
I started my card off my making the base of white and black cardstock layered with a stitched rectangular frame of designer paper. Then using the speech bubble die, I cut out 2 so I could layer the white on top of the black. I used the new Boughs of Holly set to diecut the "believe" and then stamped the sentiment using the same set. I did add some Wink of Stella to the die cut for some extra sparkle :)
Finally I stamped and colored my adorable Santa using PK~ 332 Santa Set. Lots of sparkle and shine added to him and then he was popped up onto my card front. I finished my card by wrapping some Candy Cane Trendy Twine and tying a bow as well as adding some random enamel dots.

My Creative Time Products Used:

Boughs of Holly (sneak)
Stitched Rectangular Frame Dies
Speech Bubble Sentiment stamp set

For my next project I made a few quick tags......
Emma's stamps and dies make it so easy to whip up tags for all those last minute gifts. For these, I used the Just Tag dies and stamped both the sentiment and those pine branches onto the top layer of the tag. Then using the berries die I added 2 to each set of branch cluster. I added some stickles to each then using some burlap ribbon, stapled them to the top of the tags.  These were so easy to make and took less than 5 minutes each..... LOVE that!

My Creative Time Products Used:
Boughs of Holly (sneak)
***Sneak Peek giveaway!***
We will be giving away the sets we are showcasing each day to ONE lucky winner! For example, the set we are showcasing on Wednesday, Emma will announce the winner of that on Thursday & the sets we are showcasing on Thursday, Emma will announce that winner on Friday in her video!
ALL you have to do is leave a comment on each of our blogs! 
You are NOT required to comment on EVERY SINGLE blog, but the more you comment on, the better chance you have for winning! VERY IMPORTANT, PLEASE leave a way for us to contact you w/your comment just in case "YOU" are the lucky winner! 
For EXTRA entries, you can spread the word about this release on Facebook, tweet about it OR even instagram it! #mycreativetime!
GOOD LUCK EVERYONE & let's start spreading the word!;)

Thanks so much for stopping by today and I will see you all back here tomorrow for day 3!
Make sure to check out the rest of the AMAZING inspiration! You can see it all over on the My Creative Time blog!

Monday, October 20, 2014

MCT 37th New Release Sneak Day 1

Good Morning and welcome to Day 1 of sneaks for the new
My Creative Time 37th  Release!

Miss Emma has another AMAZING new release and the DT can not wait to share all of our projects with you! We all know you are going to LOVE everything in this release.
So sit back and get ready for a GREAT week of inspiration followed by our blog hop on Friday when we will show you all the entire new release and it will be available for purchase!

Today the DT will be showcasing projects using the new set~
Whimsical Trees & Seasonal Greetings

I have 2 different cards to share today. So lets take a look......
For my first card is used the FUN new stitched pine tree to make a simple Christmas card. I layered the die cut tree, with the trunk of the tree (also a new die) onto a layered mat of red and white carstock~both cut out using the Label Dies. I placed those pieces aside and went about assembling my card base. I used the largest Stitched Frame and designer paper from Echo Park. I wrapped a beautiful red shimmery bow around the mat and then layered all the pieces onto my kraft cardstock base. My pine tree focal point was them attached above the ribbon and I used the new sentiment, an altered vintage label banner die and centered it under the bow. Love that this can be a card you can mass produce.

My Creative Time Products Used:
Seasonal Greetings (Sneak)
Stitched Rectangular Frame Dies
Vintage Stitched Label Dies
XL Label Die
Stitched XL Label Die

For my next card I made a sympathy one :( for Emma's sister who recently lost her furbaby
For this card, I started out with a kraft cardstock base and layered white and designer paper for my mat. I again used the large stitched rectangle die (my favorite!) with My Minds Eye~Blush paper. Next I used the tag die and matching designer paper, layered that into my card mat and tied a beautiful shimmery pale pink ribbon to the top.
For the focal point of my card, I die cut a circle out of white and stamped my sentiment onto that. I added the adorable pup, again cut out with matching designer paper and popped him up onto the center of the circle. I added several heart die cuts (all from the new Seasonal Greetings set) and randomly placed them around the puppy.

My Creative Time Products Used:
Seasonal Greetings (Sneak)
Stitched Rectangular Frame Dies
Loyal Friends
Tag Die Layers
Bunch of Fun Circle Dies

***Sneak Peek giveaway!***
We will be giving away the sets we are showcasing each day to ONE lucky winner! For example, the set we are showcasing on Wednesday, Emma will announce the winner of that on Thursday & the sets we are showcasing on Thursday, Emma will announce that winner on Friday in her video!
ALL you have to do is leave a comment on each of our blogs! 
You are NOT required to comment on EVERY SINGLE blog, but the more you comment on, the better chance you have for winning! VERY IMPORTANT, PLEASE leave a way for us to contact you w/your comment just in case "YOU" are the lucky winner! 
For EXTRA entries, you can spread the word about this release on Facebook, tweet about it OR even instagram it! #mycreativetime!
GOOD LUCK EVERYONE & let's start spreading the word!;)

Thanks so much for stopping by today and I will see you all back here tomorrow for day 2!
Make sure to check out the rest of the AMAZING inspiration! You can see it all over on the My Creative Time blog!


Wednesday, October 15, 2014

Baby, It's Cold Outside.....{MCT What a Treat Wednesday}

Good Morning and Happy Hump Day!!!

It is going to be a super busy day here on my blog and FB~ I have 2 posts for you today
~What a Treat Wednesday with MCT HERE
and
~Peachy Keen Stamp new October Challenge HERE
PLUS
Peachy Keen has their new release starting at 10am and we are doing a fun FB hop HERE
I hope you will check out all of my projects :)

Now for today's projects! It is What a Treat Wednesday where the DT makes any container, treat and or packaging with My Creative Time stamps and dies!
So super fun considering I just LOVE to make holiday treats :)
While cruising Pinterest, I came across this project using Hersey Nuggets. I wanted to make my own version using my stamps and dies from MCT and this is what I came up with....
How super CUTE are these...right?? I totally got hooked and ended up making 5 BUT plan on making a bunch more!

For both of these I used the same packaging...clear pretzel bags that I cut down to the size I wanted. I topped each bag with the topper made from taking the XL Label Die and folding it in half...then layering the Stitched XL Label Die over it. 
Then using one of the sentiments from the You're So Cool stamp set, I stamped both onto the topper. To close the bags up, I wrapped some Cherry Licorice Trendy Twine around the toppers and tied a bow. Some enamel dots (yes I know I am obsessed with them...LOL) and the toppers were done.
Now for the snow men, I stamped each piece of cardstock~ measuring 1x3 with my Peachy Keen Faces. I added some color using my chalk and copics as well as my white gel pen. Then for their adorable hats, I used the fingers from old gloves...you know the ones that seem to miss the other pair to make a set...LOL! We seem to have quite a few of those around...BUT these gloves can also be picked up at the Dollar Store :)
So I cut the fingers off each and then rolled up to make the mini hat. It was so adorable as is but for some extra cuteness I decided to make some matching Trendy Twine pom poms.
Totally completed this project I think!

My Creative Time Products Used:
XL Label Die
Stitched XL Label Die
You're So Cool

Peachy Keen Stamps Used:
PK~520 Winter Face Assortment Package

Other Products Used:
Trendy Twine~ Cherry Licorice
chalk, copics, white gel pen
enamel dots

Well that it all I have to share :)
  Make sure you head on over to My Creative Time to see what the rest of the Design Team has created.
Thanks for stopping by and have a GREAT Wednesday!

Don't forget....
Sneaks for the 37th New Release begin on Monday! Another AWESOME release that I know you will all LOVE!!!!

And one last reminder....
Come play along with the new Designers Challenge!
It is this AWESOME picture and all the details can be found HERE

Harvest Greetings.....{PKS Challenge 14-14}

Morning everyone!
Welcome to another fun Peachy Keen Stamps Challenge!!!!
Fall is in the air, the leaves are such a gorgeous color around here and it is almost Halloween time!!
It's the 15th of the month, which means the start of another Color/Photo Inspiration over at Peachy Keen Stamps!
Here is the inspiration picture....... They are beautiful ones!!!


And here is the card I made! My inspiration came from the  orange and brown colors and the picture of the pie :) Yummmmmm Pumpkin Pie...LOL!
Here is how I made this... I started with a kraft cardstock base and die cut 2 of the rectangle frames in designer paper. The bottom layer is wrapped with some Trendy Twine and taped to the base. the second layer is popped up using some foam squares for extra dimension. 
Next I cut all the pieces of the  pumpkin pie using my cameo. I hid the face that came with the file so I could stamp my Peachy Keen Kawaii face! So cute!!!
Once all the pieces were die cut and the face was stamped, I put the image together, adding some foam dots to the whipped cream~again for added dimension.
I popped the whole image onto the card front and then added my sentiment.
When picking the sentiment for my card, I thought this card would go great with a home made pumpkin pie. Don't you?
To finish my card off I added some random enamel dots and again popped up the sentiment.
Lots of dimension and cuteness on this card!

Peachy Keen Stamps Used:

My Creative Time Products Used:

Other Products Used:
SVG Cutting Files~ Sweet Thing
Trendy Twine~ Krazy for Kraft
Recollections~Harvest Delight paper pack
Chalk, pop dots, enamel dots, copics, white gel pen
distress ink

I hope you have enjoyed my card and will play along with the new challenge!!
You can find out all the details by heading over to the Peachy Keen Blog as well as see the inspiration from the other DT members!
I can't wait to see what you all come up with!

Thanks so much for stopping by and have a GREAT day!!!

Tuesday, October 14, 2014

Trick or Treat......{MCT Tag It Tuesday}

Good Morning and welcome to 
Tag it Tuesday w/My Creative Time!
Today the DT will be sharing  tags following the photo inspiration below and using of course all the great My Creative Time! stamps and dies that Miss Emma has to offer.
Photo Credit
Here is the tag I made.... I used some of the colors from the photo and went more cute than scary :)
I just LOVE how it turned out and hope you do too!
So here is how I made my CAS tag. I started with the Tag Dies set and die cut it using black cardstock. Then using the Tag Die Layers set, I die cut the top layer using kraft cardstock. To add some color to my tag, I used the circle border die, also from the Tag Die Layers set, I cut 3 lines into my top layer. Using scraps of cardstock in yellow, orange and green, I placed them behind the cut out parts, then added the black tag base. 
Next, I die cut the witch's hat from the new Wicked Fun Dies set and popped it up onto the front of my tag. I stamped my sentiment using the Mixed Holiday Sentiments set and added some cream, orange and black hemp cording I picked up in the dollar bin at Target.
I thought my tag was still missing something so I pulled out my drawer of googly eyes and added them right under the hat. So cute don't you think???
Looks like someone or something is peeking out...LOL!

My Creative Time Products Used:

Other Products Used:
Kraft, Black, orange, yellow and green cardstock
googly eyes
hemp cording
pop dots

Well that it all I have to share :)
  Make sure you head on over to My Creative Time to see what the rest of the Design Team has created.
Thanks for stopping by and have a GREAT Tuesday!

Don't forget....
Sneaks for the 37th New Release begin on Monday! Another AWESOME release that I know you will all LOVE!!!!

And one last reminder....
Come play along with the new Designers Challenge!
It is this AWESOME picture and all the details can be found HERE