Tuesday, October 29, 2013

Football Season.....{Challenge Project}

Good Morning Everyone!!!
Hope the start of your week has been a good one.
I have another project to share today, this one for a few challenges I would like to enter.
This week over at Peachy Keen Stamps, the challenge was 3D Fall Sports. 
Football season has just ended for my oldest :( 
so this challenge was perfect for making a treat that I know he would LOVE.
I hope you don't mind also that I share a few football pics of him as well.

Here is my son...#30 for the Clarence Bulldogs.
He is the starting Center and I am so proud of him. He has worked his butt off this season and even though they had a poor record each and every kiddo on that team played hard!

The annual Pink Bowl...A local business donates pink socks to all the boys to wear for the month of October for Breast Cancer Awareness. I LOVE to see them add addition pink to their uniforms. I made pink bones to add to their helmets and they really show their support!
 Thanks to Annie over at SVGCutting Files~ she made this Bulldog cut for me and I turned it into a vinyl image that I added to a tumbler. On the back I added Casey's initials and number. Turned out adorable....so much so that I had a bunch or orders for these to be made for others :)
And here is the final game of the season that took place on Saturday night. 
It was COLD, WET, RAINY/SLEETING and oh so MUDDY!!!
I am still cleaning up all the mud that came home with us :)
~~~~~~~~~~~~~~~~~~~~~~~~~~~
Now that I shared my pictures~ thanks for keeping with me...
Here is my project!
I wanted to keep it on the simpler side,  seeing that he is a teen boy...LOL!
So here is what I made for him....
I used the Sports Bags Gift Bags SVG file from SVGCutting Files and embossed the football using the swiss dots embossing folder. After putting the bag together~which BTW was SO SUPER EASY~ I made the tag to attach to the bag. Using the October SOTM kit from Peachy Keen Stamps, I stamped the border on a die cut circle from the matching SVG file from PKS and then added the sentiment into the center. On a separate piece of cardstock, I stamped the football from the same PKS set and then fussy cut and popped it up onto the tag.
Finally, I added some Krazy For Kraft Trendy Twine to attach the tag to the bag, then filled a pretzel bag with some of my son's favorite candy....gobstoppers :) and tied that with another piece of TT.
So there is my project....I sure hope you all like it!
Thanks so much for hanging with me for this super LONG post!
 ~~~~~~~~~~~~~~~~~~~~~~~~~
Entering this into the following Challenges:
Peachy Keen Stamps~ 13~43 3D Fall Sports
SVG Cutting Files~ Gifts Galore
Just B Creative Crazy~October Linky
Word Art Wednesday~ Anything Goes

Monday, October 28, 2013

Happy Halloween Witch Tag.....{TKJ}

Good Morning and Happy Monday everyone!!!
It is time for a new challenge over at
 The Kraft Journal!

This week the challenge is:
Witches and Goblins
and here is what I made....
I was inspired by a stamp that I had yet to use, that has been sitting on my desk ready to be inked up, this sweet Recollections Witch. Instead of making a card with her, I decided to made a tag that will be attached to a treat and handed out to a friend. To make this tag, I started out using a Large Manila Shipping Tag and with my ink blending tool and some Black Soot Distress ink, covered the tag. I then cut a piece of designer paper for the front of the tag and added a cute die cut spider web.For the added sentiment I used a new favorite product from The Kraft Outlet~ the Chit Chat Seasonal Word StickersThat sticker pack is FULL of great holiday sentiments! Putting the tag aside for a bit, I went about stamping and coloring up my Witch using  copic markers. To attach the Witch onto my tag, I popped her up with some foam pop dots. After adding a matching brad to the spider web, I further embellished my card with some Black Twill Tape and White Hemp Cord.

So there you have it....
my inspiration for this week's challenge.
I hope you have enjoyed my card and will play along with us!
As always I have linked all the supplies I used from The Kraft Outlet throughout my description.  If you have not checked out the store yet....make sure you do! There is so much available, the prices are so reasonable and shipping is super fast!!!

Thanks for stopping by and have a GREAT Monday!!
~~~~~~~~~~~~~~~~~~~~~~~
Ribbon Carousel BlogFall/Halloween
Just B Creative Crazy~October Linky
Word Art Wednesday~ Anything Goes
Simon Says Stamps~ Halloween

Thursday, October 24, 2013

Happy Halloween Pillow Boxes.....{Teacher's Gifts}

Good Morning and Happy Thursday!
We are one more day closer to Friday and the weekend!!
Yippeeee!!!
I have be busy making Halloween treats for my youngest son's class as well as Teacher's treats for both of them to hand out.
I have one set of Teacher treats to share with you all today...
I LOVE making pillow boxes! LOVE the different ways you can decorate them and LOVE all the fun treats that can be put inside them!
I made a set of 6 using some new stamps and dies I just got from My Creative Time...
here they are, hope you like them!!!

I used a pillow box cut from the Silhouette Store and sized it in my studio to fit a piece of 6x6 designer paper. The paper I used is all from The Spooky Time Stack from DCVW. Once I had all the boxes cut out, I moved them aside to work on the rosettes.

 
Those gorgeous rosettes are from the new release over at 
My Creative Time~Scalloped Stitched Rosette Dies and I cut them using some black card stock from my stash. After assembling all the rosettes, I used the new stamp set~ All Around Holidays for the sentiment as well as the pumpkin die from that same set.
To finish these off, I used some ribbon that I had in my HUGE pile of ribbon that has been neglected...LOL, tied a big bow to the top and hot glued the rosette to the front. All this after filling the pillow boxes with some chocolates :)
So there they are...Didn't they turn out adorable???
So happy to say one classroom of treats are done...Now to make teacher treats for my older son and I am done with my Halloween goodies!

That is all I have for you today. Thanks so much for stopping by to say hello and have a GREAT day!
~~~~~~~~~~~~~~~~~~~~~~~~~~~~~~~~~~~~
Entering this into the following challenges:
My Creative Time~ Designer's Challenge (Pumpkins)
Simon Says StampsHalloween
The Pink Elephant~ Trick or Treat
Craftin Desert Divas~ Halloween Party
Paper Issues~ Halloween
Cameo Creations~ Lots of Candy
Ribbon Carousel Blog~ Fall/Halloween
Just B Creative Crazy~ October Linky Party
Cupcake InspirationChallenge 233
Lia Stampz~ Challenge #51 Spooky Bingo
(Ribbon, Die Cut, Pumpkin)

Wednesday, October 23, 2013

Got Candy????.......{Halloween Treat}

Good morning 
and 
Happy Hump Day!!
I am back again with another fun Halloween treat idea...this one using a file from the Silhouette store that was SO easy to put together!
Here it is...hope you like it :)
I used the Candy Corn box file from Lori Whitlock and cut my colored pieces using scrap from my stash. I machined stitched the layers onto the box but before putting the box together I stamped my sentiment from Jaded Blossom's~ Got Candy stamp set.
Once the box was assembled, I added a button from my stash and some Totally White Trendy Twine.

So there is my project and short and sweet post!
Thanks so much for stopping by today and have a GREAT hump day!
~~~~~~~~~~~~~~~~
Entering this into the following challenges:
Craftin Desert Divas~ Halloween Party
Paper Issues~ Halloween
Simon Says StampsHalloween
Cameo Creations~ Lots of Candy
Ribbon Carousel Blog~ Fall/Halloween
Cupcake Inspiration~ Challenge 233

Tuesday, October 22, 2013

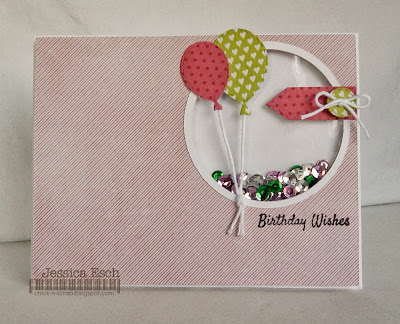
Birthday Wishes Shaker Card....{Challenge Card}

Morning everyone and Happy Tuesday!
I have a birthday card to share today that I made to enter a few challenges..
First up is the sketch from this week's Peachy Keen Stamps challenge and next is the color combo from My Craft Spot.
I hope you like my shaker card, it was inspired by Nikki over at Scrappin' Navy Wife. She makes the most beautiful shaker cards!
So here are my inspirations....
 
and my take on the sketch and colors...Hope you like it!
What do you think??? I had a hard time taking a picture of this without getting a reflection back from the plastic on the shaker. This seems to be the best I can do with my poor photography skills :(
Anyways, I took the PKS sketch and did a flip and twist to bring the main part of the sketch up to the top right hand corner. That way the sequins could be seen laying in the bottom.
Here is a close-up of all the details from this card.  I used the sequins I have in my stash and added the sentiment under the shaker part using the October SOTM set from PKS. I further embellished the card with the balloon die cuts, tiny tag die cut and button die cut all from MCT. To complete the card, I added some Totally White Trendy Twine for the balloon strings and button bow.

Supplies Used:
Paper~ Echo Park Beautiful Life
white card stock
Stamps~ PKS~October SOTM
Dies/Cuts~ My Creative Time
Stitched Party Dies
Stitched Button Dies
Teeny Tag Die
Embellishments~ Trendy Twine~Totally White
sequins
pop dots

So there is my card for today. I hope you all like it!! I can totally see making more of these shaker cards....they are so fun! Just need to get some better foam tape and more sequins :)
Thanks for stopping by and have a GREAT Tuesday!!
~~~~~~~~~~~~~~~~~~~~~~~~~~~~~~~~~
Entering this into the following challenges:
Peachy Keen Stamps~ Sketch Challenge
My Craft Spot~ Color Challenge
Word Art Wednesday~ Anything Goes
Just B Creative Crazy~October Linky

Monday, October 21, 2013

Trick or Treat....Pumpkin Gift Set......{TKJ Color Challenge}

Good Morning and Happy Monday everyone!!!
It is time for a new challenge over at
 The Kraft Journal!

And this week the challenge is:
 A Color Challenge
And here is my take on it.....
A few weeks ago I posted a Pumpkin Spice Creamer recipe/gift card (you can see the original post HERE) and wanted to finish another gift set to send to a friend. 

I used both the colors and the picture of the pumpkins as my inspiration. I started out my card using a piece of Brown Kraft Cover Weight Cardstock and added my layers of pattern paper using Simple Stories~ Take a Hike paper pack. After adding my signature machine stitching border, I wrapped some Kraft Wraphia Ribbon around the mat and tied it in a simple knot. Then using a White X-Small Tag and some Chit Chat Seasonal Word Stickers added "trick or treat" to the tag.  I then went ahead and using some Brown Earthy Hemp Cord , tied the tag to the Kraft Wrapia Ribbon
To finish up my card, I die cut a scalloped circle using the Brown Kraft Cover Weight Cardstock and stamped the cute pumpkin on white cardstock for the center of the scallop. 
To match my card, I made this beautiful decorated mason jar filled with the Pumpkin Spice Creamer. I used the same Brown Kraft Cover Weight Cardstock  and designer papers, wrapped more of the Kraft Wrapia Ribbon around the lid of the jar and made a matching pumpkin tag that I tied onto the jar using some of the Brown Earthy Hemp Cord.

So there you have it....
my inspiration for this week's challenge.
I hope you have enjoyed my card and will play along with us!
As always I have linked all the supplies I used from The Kraft Outlet throughout my description.  If you have not checked out the store yet....make sure you do! There is so much available, the prices are so reasonable and shipping is super fast!!!

Thanks for stopping by and have a GREAT Monday!!
~~~~~~~~~~~~~~~~~~~~~

Entering this into the following challenges:
Word Art Wednesday~ Anything Goes
Just B Creative Crazy~October Linky
Craftin Desert Divas~ Halloween Party
Paper Issues~ Halloween
Ribbon Carousel Blog~ Fall/Halloween
Cupcake Inspiration~ Challenge 233

Saturday, October 19, 2013

Craftin Desert Divas Halloween Spooktacular Blog Hop {Day 1}

Good Morning 
and
Welcome to the
Craftin Desert Divas Spooktacular Halloween Blog Hop!!
We are so happy that you could join us today! If this is the first time that you have hopped with us you won't be disappointed. My friends are all amazingly talented.

Please be sure to start at the beginning at Craftin Desert Divas so you don't miss out on a thing! You will not only get some inspiration, but you could win GREAT prizes, too!! You must FOLLOW and COMMENT at all of the stops both days to have a chance to win.

Here's the wonderful sponsors for this hop...
For this two day hop,  each blog on both days of will be offering a prize from a sponsor. You must visit each stop both days to be eligible to win.  Winners will be announced Oct 22. 
The complete list of winners will be on Craftin Desert Divas blog.

My sponsor is: 
who is offering the winner 1 stamp set of their choice :)

Now onto the hop....You should be coming from
Tara's ~
who is also our awesome hostess and hop start point. 
If you are just popping in, make sure to go back to see what amazing project she created!!!!!
Remember you have to comment at each stop to be eligible for the prizes.

Since I LOVE making and giving treats I made 2 different treat ideas for my boys to decide which one they wanted to hand out to their friends on Halloween.
Here they are....hope you like them :)
Here is project #1....I made some Twinkie Mummies....EEEKKK aren't they just the CUTEST???  Here is the original post where the idea came from. I have to admit it was my husband who found them :) I knew he had come craftiness in him!!!
Ok so they said these were easy to make....well they were not difficult...they just take some time. But the finished product looks and tastes so yummy!!!
To package them up, I used some clear treat bags and tied some Totally White Trendy Twine around the bottom. Then using My Creative Time~ Stitched Fun Ticket Dies and some white and black cardstock from my stash, I die cut the tickets and stamped my cute sentiment also from My Creative Time~ Spooky Starry Night stamp set.
These were a HUGE hit with the boys...

Now onto project #2....
I have been meaning to stamp these fun wooden Halloween images that I picked up from Micheal's last year and when I was going through my stash and came across them again I had the perfect idea for them. Since the Dracula is just way to cute, I set out on a mission to find some Dracula teeth as a treat.
I thought originally that the wax fangs would be a fun idea...well after getting a few home and letting my youngest have one, he was not too fond of the taste...LOL!
But instead I found these plastic mouth/fangs that had a sucker on the back (like a ring pop)
and tada...this is what came out of that...
So again, I used the clear treat bags and placed my fang suckers inside.....then using that cute Dracula stamp, I inked him up and stamped him on some white cardstock. I wanted to add alittle color to him so I took my red copic and colored his fangs and cape.
He was then mounted on a scalloped circle base and a hole was punched in the top to add as a tag. 
I wrapped some Peppermint Stick Trendy Twine around the bag, added my tag and tied a simple bow. I guess I could have left it like that, but when I saw the fun sentiment from My Creative Time~All Around Halloween I knew I had to use it :)

So there are my projects....What do you think???
They jury is still out on which will be the treat of the day :)
Well I have kept you here long enough....

Your next stop is the super talented

Here's a complete list of the line up in case you get lost along the way
Day 1 Line-up

Day 2 Line-up
Michelle - http://mumoftwoblog.blogspot.com

Thanks so much for stopping by and hopping with us!!!
Have a GREAT weekend!!!!

~~~~~~~~~~~~~~~~~~~~~~~~
Entering this into the following challenges:
Decorate to Celebrate~ Ghostly Goodies
Just B Creative Crazy~October Linky
Craftin Desert Divas~ Halloween Party
Paper Issues~ Halloween
Word Art Wednesday~ Anything Goes
My Craft Spot~3D Halloween
Ribbon Carousel Blog~ Fall/Halloween

Friday, October 18, 2013

Anything Halloween w/Ribbon.....{3GJ Challenge #27}

It is a happy day over here....
I am hosting the new challenge for
and
this week's challenge is~ 
Anything Halloween w/Ribbon
This week's challenge will be open for 2 weeks, October 18th~ October 31st  , so plenty of time to create and share!!

Our challenge is being sponsored by:
3 Girl JAM
with a $10 Gift Certificate to the 3Girl JAM store!
Awesome prizes for sure!!!!
~~~~~~~~~~~~~~~~~~~~~~~~~~~~~~~
Now onto my project! I love making tags, especially ones that can be made in groups, take little time to assemble and turn out super cute :)
So for my project today I made some ghost tags that I will add to some teacher's gifts for Halloween. 
How cute are these...right?? And the best thing is they were so easy to put together. I made 8 of them in no time :)
To make these I used MCT Just Tags dies and white and black cardstock. After die cutting the pieces, I stamped the cute sentiment in the bottom corner of all the tags and then glued on some googly eyes.
You can't have tags without some ribbon right...So I added some 3GJ Tuxedo crinkle ribbon from the Celebration Bundle and tied on some Black Licorice Trendy Twine to hold the ribbon in place. 
And that is it! So easy and super fast to put together. 

I sure hope you have enjoyed my project and will play along with us over at the 
Remember this challenge will run for 2 weeks so lots of time to get your
Anything Halloween w/Ribbon 
projects in!!
Thanks so very much for stopping by!!
Have a GREAT Friday!! 

Supplies Used:
Paper~ White, Black
Stamps~My Creative Time~Fright Night
Dies/CutsMy Creative Time~ Just Tags
Embellishments3GJ Celebrations Bundle~ Tuxedo
Trendy Twine~Black Licorice
googly eyes

~~~~~~~~~~~~~~~~~~~~~~~~~~~~~~~~~
Entering this into the following challenges:

Just B Creative Crazy~ October Linky Party
Word Art Wednesday~ Anything Goes

Pile it On~ Humor
Craftin Desert Divas~ Halloween Party
Paper Issues~ Halloween
Ribbon Carousel Blog~ Fall/Halloween


Tuesday, October 15, 2013

Falling for You.....{Challenge Card}

Hey everyone!!
I have another Halloween card to share that I made for a few challenges.
I used the colors from this week's Cupcake Inspiration and the sketch from Stella Says Sketch over at Catch the Bug
And came up with this..... 
Sorry about the poor picture, for some reason after taking SO many pictures (not my strong point at all) I gave up and used this one. 
Anyways I used the adorable AKV Witch Kitty digi from Bugaboo Stamps and colored it using my copic markers and the added some stickles. I did use my Cameo to make a mat around the image and then mounted that on some black cardstock.
The designer paper is from My Minds Eye~Blackbird  and after cutting my pieces out, I of course added some machine stitching around the outside. 
The black mat needed something else, so I cut a corner spider web, again using my Cameo and a file I picked up from the store.
Finally, I used My Creative Time~ All Around Halloween for the sentiment and that adorable spider
So there you have it....another Halloween card to add to my pile (actually to add to my Etsy store HERE)
Thanks so much for stopping by and have a GREAT rest of your day!!!
~~~~~~~~~~~~~~~
Entering this into the following challenges:
Pile it On~ Humor
Just B Creative Crazy~October Linky
Craftin Desert Divas~ Halloween Party
Paper Issues~ Halloween
Catch the Bug~ Stella Says Sketch
All That Stickles~ Halloween Linky Party

Monday, October 14, 2013

Halloween Chalkboard Tags .....{TKJ}

Good Morning and Happy Monday everyone!!!
It is time for a new challenge over at
And this week the challenge is:
Discover Something New

Such a fun challenge because I don't know about you but I am always looking for a new technique or a new tutorial that I want to try. I have a HUGE bookmarked list of all of them so I can cross one off now with my project I have to share with you today. 
I have watched people post these awesome Chalkboard technique projects and wanted to give this a try. Well after watching this GREAT video over at Splitcoaststampers HERE,  these are what I came up with. I sure hope you like my Halloween tags. They were a BLAST to make and put together, so I highly recommend you all to give this a try!!!

So this is how I made them. 
I started out with some blank Blackboard Tags and using some adorable Halloween stamps I picked up at Micheal's in the dollar bin last year, I heat embossed them using Creative Inspirations Paint Deliquesce White Embossing Powder. Then using a white prismacolor pencil I added some details to each of the tags around the border in a decorative pattern. Now for the fun part....I used a makeup sponge and some white pigment ink and went about giving the tags the chalkboard look. The great thing about this technique is that there is no wrong way to do it and you can add as much or as little color to the paper as you want to get the desired look. Then to finish the tags off I added some Orange Hemp Cording . I couldn't leave the tags as is, so I decorated some Small Glassine Bags with a pieces of Black and White Polka Dot Washi Tape wrapped around the base of each bag.  To attach the tags to the bags I took some Tiny Wooden Clothespinsadded more of the Black and White Polka Dot Washi Tape and clipped them onto the bags.

 
So there you have it....
my inspiration for this week's challenge.
I hope you have enjoyed my card and will play along with us!
As always I have linked all the supplies I used from The Kraft Outlet throughout my description.  If you have not checked out the store yet....make sure you do! There is so much available, the prices are so reasonable and shipping is super fast!!!

Thanks for stopping by and have a GREAT Monday!!
~~~~~~~~~~~~~~~~~~~~~
Entering this into the following challenges:

Inspired By Stamping~ Chalkboard Technique
Word Art Wednesday~ Anything Goes
Ribbon Carousel Blog~ Fall/Halloween

Just B Creative Crazy~October Linky
Craftin Desert Divas~ Halloween Party
Paper Issues~ Halloween