Showing posts with label 37th New Release. Show all posts

Friday, October 24, 2014

MCT 37th New Release Blog Hop

Good Morning 
and 
Welcome to the much anticipated 
37th New Release from My Creative Time!

This week has been so much fun with the DT sharing amazing projects and inspiration! But we have one more day of AWESOME~NESS! 

Now you should be coming from the VERY talented
but if you are just stopping in, make sure to head back to the start~ the AMAZING 
You are not going to want to miss a thing! She really ROCKED this release (well she always does, doesn't she?? Of course!!)

Today I get to showcase the
 Seasonal Greetings and Whimsical Trees sets
I have 3 projects to share so lets get started...
For my first card I went CAS so I could focus on the AWESOME new stamps and dies from both sets. I made a fun embellishment using the oval dies from the new Seasonal Greetings set to make a pumpkin. I stamped each of the ovals with the coordinating stamp from the Whimsical Trees set. It gives them such a great little extra don't you think???
Then for the stem, I used the truck of the tree die for the evergreen. It is a PERFECT size! I also added a leaf using the smallest from the Stitched Leaves Dies and tucked it in between the popped up top layer of my pumpkin. An added hemp twine bow and my embellishment piece was completed. To finish off my card, I stamped the sentiment from the Seasonal Greetings set and added 2 enamel dots. 
~~~~~~~~~~~~~~~
For my next card, I switched seasons and went for a wintery theme which unfortunately will be in my neck of the woods really soon :( 
I just LOVE the new tree dies from the Seasonal Greetings set! I cut this evergreen out using white cardstock and then glittered it up using diamond stickles. I then popped it up on top of the tree truck but before I did that, I went about putting the card mat together. I layered my card base of kraft with some white cardstock and then designer paper from Echo Park~Winter Park using the largest of the Stitched Rectangular Frame Dies & More. I used the same die to make a smaller piece with matching designer paper and then added a decorative border in white cardstock using one of the Fun Stitched Edges dies. For the sentiment, I stamped it onto the card front, and instead of using it side by side (which is how it was designed) I stamped the "Winter" first and then stamped the "Wonderland" below it. Taping off the sentiment I did not want to stamp so I could get the stacked look instead.
Here is another picture of the tree popped up, the beautiful script of the sentiment and the added enamel dots that I used to finish my card off with.
~~~~~~~~~~~~~~~~~
For my final project I made a Christmas treat that would be perfect to hand out to the teachers for the holidays.
I again used the Evergreen die from the new Seasonal Greetings set and added it to the top of my Treat Slider Box. I filled the box with some covered Hersey nuggets and then wrapped it with some Totally White Trendy Twine. I added a fun sparkly button and my stamped sentiment. I used the Vintage Stitched Label Die and the sentiment from the Seasonal Greetings set. The banner was then tucked underneath the button and secured with some foam pop dots. This was super easy to put together and would be super easy to mass produce. Especially if you have several teachers to give gifts too. I know each of my boys have 8. That's alot of holiday gifts which could get  VERY costly. These are fun, sweet (because everyone loves chocolate right??) and make a GREAT holiday gift!
So there are all of my inspiration projects!
Now for all the good stuff.....

"FREEBIE STAMP"
****UPDATE ON FREEBIE STAMP SET!!!!!****
Hello my sweet friends! Okay, the first 150 shoppers have already came thru! For those invoice numbers 13533 thru 13683, you are the LUCKY ones that will be getting this ADORABLE "Christmas Doggy" in your pkgs! If you missed out on this cutie patootie FREEBIE, it is available for purchase here


***BLOG HOP GIVEAWAY***
For our blog hop giveaway, Emma is giving away a $50 gift card to the "My Creative Time" store to ONE LUCKY winner! ALL you have to do is leave a comment on each of our blogs! You are NOT required to comment on EVERY SINGLE blog, but the more you comment on, the better chance you have for winning! VERY IMPORTANT, PLEASE leave a way for us to contact you w/your comment just in case "YOU" are the lucky winner! 

***SALE ALERT***
ALSO, DON'T FORGET our sale starts RIGHT NOW! Use the code: OCT2014 to receive 20% off your entire purchase! This sale applies to "IN-STOCK" items ONLY. This sale will end on Friday, October 31, 2014 @midnight PST.

And here is the whole release!


BLOG HOP LINE UP
Brigit - http://www.brigitsscraps.com

Well your time with me is up... your next stop along the hop is the super sweet and very talented
Stacey
Thanks so much for hopping along with us and have a GREAT Friday!!!

Wednesday, October 22, 2014

MCT 37th New Release Sneak Day 3

Good Morning and welcome to Day 3 of sneaks for the new
My Creative Time 37th  Release!

Another AWESOME day of projects to share and more FUN new stamps and dies! Such a GREAT release and I know you are all LOVING it so far :)


Today the DT will be showcasing projects using the new set~
Winter Cheer


For today's inspiration I made a shaker card using one of the new dies and one if the matching sentiments.......
Aren't those new ice skate dies AWESOME?????  LOVE them :)
So here is how I made my card.... I started with a kraft cardstock base and added a layer of blue cardstock and another layer of designer paper that was die cut using the large Stitched Rectangular Frame. Next I die cut the frame from the Just Simply Live set and made a shaker using some seed bead in white and blue. Before assembling the shaker, I did stamp my sentiment from the new Winter Cheer stamp set. I also die cut the skates and wrapped the laces die through the frame of the shaker so it looks like it is hanging on the frame. I popped the whole piece onto the card using foam pop dots for lots of added dimension.
Here is another angle of the skates and sentiment. I did add some blue stickles to the pom poms on the skates as well as placed some enamel dots around the frame.
A bit of embossing on the shaker inside using a fun snowflake folder for sure added to the overall feel of this card.

My Creative Time Products Used:
Winter Cheer (Sneak)

***Sneak Peek giveaway!***
We will be giving away the sets we are showcasing each day to ONE lucky winner! For example, the set we are showcasing on Wednesday, Emma will announce the winner of that on Thursday & the sets we are showcasing on Thursday, Emma will announce that winner on Friday in her video!
ALL you have to do is leave a comment on each of our blogs! 
You are NOT required to comment on EVERY SINGLE blog, but the more you comment on, the better chance you have for winning! VERY IMPORTANT, PLEASE leave a way for us to contact you w/your comment just in case "YOU" are the lucky winner! 
For EXTRA entries, you can spread the word about this release on Facebook, tweet about it OR even instagram it! #mycreativetime!
GOOD LUCK EVERYONE & let's start spreading the word!;)


Thanks so much for stopping by today and I will see you all back here tomorrow for day 4!
Make sure to check out the rest of the AMAZING inspiration! You can see it all over on the My Creative Time blog!


Tuesday, October 21, 2014

MCT 37th New Release Sneak Day 2

Good Morning and welcome to Day 2 of sneaks for the new
My Creative Time 37th  Release!
So what did you think of yesterday's projects?? Pretty AWESOME right???
Well we have so much more to share so lets get right to it!

Today the DT will be showcasing projects using the new set~
Boughs of Holly
For today's sneaks I have 2 projects to share...a fun card and some very easy tags...
First up, my card......
I just LOVE Christmas time and I when I saw the new stamps and dies in this set, I couldn't wait to use them!
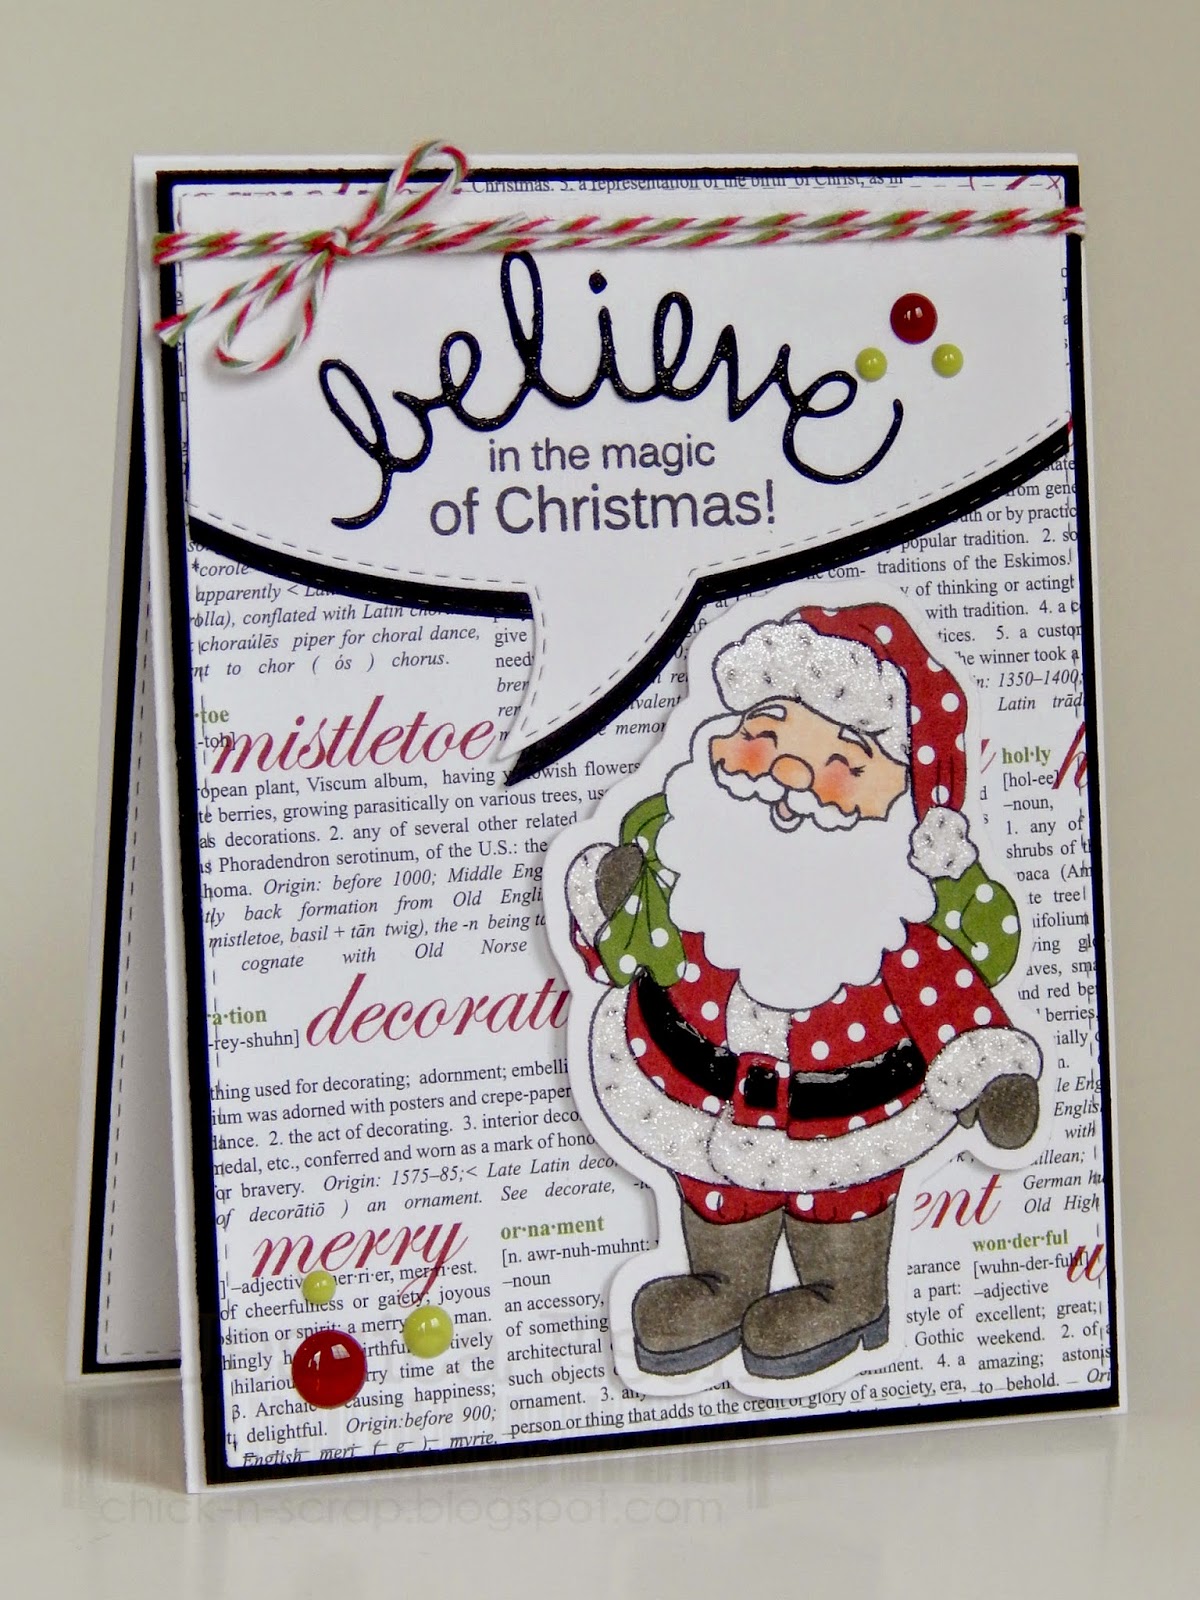
I started my card off my making the base of white and black cardstock layered with a stitched rectangular frame of designer paper. Then using the speech bubble die, I cut out 2 so I could layer the white on top of the black. I used the new Boughs of Holly set to diecut the "believe" and then stamped the sentiment using the same set. I did add some Wink of Stella to the die cut for some extra sparkle :)
Finally I stamped and colored my adorable Santa using PK~ 332 Santa Set. Lots of sparkle and shine added to him and then he was popped up onto my card front. I finished my card by wrapping some Candy Cane Trendy Twine and tying a bow as well as adding some random enamel dots.

My Creative Time Products Used:

Boughs of Holly (sneak)
Stitched Rectangular Frame Dies
Speech Bubble Sentiment stamp set

For my next project I made a few quick tags......
Emma's stamps and dies make it so easy to whip up tags for all those last minute gifts. For these, I used the Just Tag dies and stamped both the sentiment and those pine branches onto the top layer of the tag. Then using the berries die I added 2 to each set of branch cluster. I added some stickles to each then using some burlap ribbon, stapled them to the top of the tags.  These were so easy to make and took less than 5 minutes each..... LOVE that!

My Creative Time Products Used:
Boughs of Holly (sneak)
***Sneak Peek giveaway!***
We will be giving away the sets we are showcasing each day to ONE lucky winner! For example, the set we are showcasing on Wednesday, Emma will announce the winner of that on Thursday & the sets we are showcasing on Thursday, Emma will announce that winner on Friday in her video!
ALL you have to do is leave a comment on each of our blogs! 
You are NOT required to comment on EVERY SINGLE blog, but the more you comment on, the better chance you have for winning! VERY IMPORTANT, PLEASE leave a way for us to contact you w/your comment just in case "YOU" are the lucky winner! 
For EXTRA entries, you can spread the word about this release on Facebook, tweet about it OR even instagram it! #mycreativetime!
GOOD LUCK EVERYONE & let's start spreading the word!;)

Thanks so much for stopping by today and I will see you all back here tomorrow for day 3!
Make sure to check out the rest of the AMAZING inspiration! You can see it all over on the My Creative Time blog!

Monday, October 20, 2014

MCT 37th New Release Sneak Day 1

Good Morning and welcome to Day 1 of sneaks for the new
My Creative Time 37th  Release!

Miss Emma has another AMAZING new release and the DT can not wait to share all of our projects with you! We all know you are going to LOVE everything in this release.
So sit back and get ready for a GREAT week of inspiration followed by our blog hop on Friday when we will show you all the entire new release and it will be available for purchase!

Today the DT will be showcasing projects using the new set~
Whimsical Trees & Seasonal Greetings

I have 2 different cards to share today. So lets take a look......
For my first card is used the FUN new stitched pine tree to make a simple Christmas card. I layered the die cut tree, with the trunk of the tree (also a new die) onto a layered mat of red and white carstock~both cut out using the Label Dies. I placed those pieces aside and went about assembling my card base. I used the largest Stitched Frame and designer paper from Echo Park. I wrapped a beautiful red shimmery bow around the mat and then layered all the pieces onto my kraft cardstock base. My pine tree focal point was them attached above the ribbon and I used the new sentiment, an altered vintage label banner die and centered it under the bow. Love that this can be a card you can mass produce.

My Creative Time Products Used:
Seasonal Greetings (Sneak)
Stitched Rectangular Frame Dies
Vintage Stitched Label Dies
XL Label Die
Stitched XL Label Die

For my next card I made a sympathy one :( for Emma's sister who recently lost her furbaby
For this card, I started out with a kraft cardstock base and layered white and designer paper for my mat. I again used the large stitched rectangle die (my favorite!) with My Minds Eye~Blush paper. Next I used the tag die and matching designer paper, layered that into my card mat and tied a beautiful shimmery pale pink ribbon to the top.
For the focal point of my card, I die cut a circle out of white and stamped my sentiment onto that. I added the adorable pup, again cut out with matching designer paper and popped him up onto the center of the circle. I added several heart die cuts (all from the new Seasonal Greetings set) and randomly placed them around the puppy.

My Creative Time Products Used:
Seasonal Greetings (Sneak)
Stitched Rectangular Frame Dies
Loyal Friends
Tag Die Layers
Bunch of Fun Circle Dies

***Sneak Peek giveaway!***
We will be giving away the sets we are showcasing each day to ONE lucky winner! For example, the set we are showcasing on Wednesday, Emma will announce the winner of that on Thursday & the sets we are showcasing on Thursday, Emma will announce that winner on Friday in her video!
ALL you have to do is leave a comment on each of our blogs! 
You are NOT required to comment on EVERY SINGLE blog, but the more you comment on, the better chance you have for winning! VERY IMPORTANT, PLEASE leave a way for us to contact you w/your comment just in case "YOU" are the lucky winner! 
For EXTRA entries, you can spread the word about this release on Facebook, tweet about it OR even instagram it! #mycreativetime!
GOOD LUCK EVERYONE & let's start spreading the word!;)

Thanks so much for stopping by today and I will see you all back here tomorrow for day 2!
Make sure to check out the rest of the AMAZING inspiration! You can see it all over on the My Creative Time blog!