Hi blogger :)
As I wrote about yesterday I put together a picture tutorial on the patchwork. I LOVE doing this because not only do you use up scrap paper (which I have alot of) it is so fun to make and the possibilities are endless!
So here we go....I have my completed project at the bottom of this post
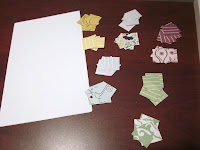
Take any combo of scraps and cut them into strips. Mine were 1" strips...my other 2 projects I cut them into 1 1/2" strips. It all depends on the size of the design you are cutting. My Dino is being cut at 3 1/2" so I wanted more pattern to show.
Here is the squares cut again 1" x 1". My paper happened to be 2 sided pattern paper so I was able to get 10 different patterns with 5 sheets of paper. You can use as many different papers or as few papers as you want.
Next peel the backing off the label and begin arranging your squares on the sticky paper. Start at one side work your way to the other and don't think too much about pattern! You will drive yourself crazy...just make sure there are not 2 of the same papers next to each other. This is what it will look like when it is all done.
Then you get to decide what cut you are going to do. I did the Dino from Create A Critter. He is cut at 3 1/2. Just put your patchwork paper on the cutting mat and cut. Nothing needs to be done different than you would normally cut. It does help to have a newer/ sharper blade. I was just amazed that the cricut cut these so nicely :)
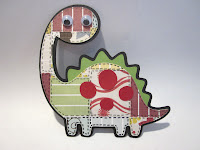
Once you have everything cut it is time to add your stitching...I used a LePlume fine point black marker. I add stitching around EVERY piece of DIFFERENT paper. And this is how my Dino came out. When I cut him I used Layer 2 as my patchwork cut. I hid the eyes and mouth with my gypsy and added goggles instead. Then for layer 3 I used only the polka dots so I hid everything else again with my gypsy.
Here is my completed card. I hope you like him and this picture tutorial. If you have any questions I will be happy to answer them. These are so much fun and like I said before a GREAT way to use up scraps.
He will be entered into the following Challenges:
M.A.G Challenge By the Page- Challenge 19 Create a Critter -Page 50
365 Cards- PQR-Polka Dots, Quilting, Red
Paper Cutz Challenge- #84- 3 Patterns of Paper


LOVE it! Thank you so much for the little tutorial, can't wait to try it out :)
ReplyDeleteJenny
www.papercutcreations.blogspot.com
papercraftjenny@gmail.com
Nice little tutorial! I love how this turned out! I became a new follower.
ReplyDeleteCathy
cathyhartle at gmail dot com
cardexpressionsoflove.blogspot.com
How awesome is that! I will have to try this, I will be going to get labels! Thanks for playing with MAG!
ReplyDeleteVery creative. Gotta try that...thanks for sharing!! Nice job!
ReplyDeleteSherrie K.
http;//sherriescraps.blogspot.com
Ohhhh... this is such a good idea!! Thanks for sharing!!
ReplyDeleteThank you so much for the tutorial. This is one that I really want to try.
ReplyDeleteVery cool...shipping labels added to the shoping list!
ReplyDeleteTara
P.S. I am a new follower, would love for you to stop by my blog too! http://creativeprincess-homemadehappiness.blogspot.com/
What a simple way to paper piece. You did an amazing job with this dinosaur. Faux stitching was a nice touch. Thanks for playing with us this week at MAG
ReplyDeleteWhat a great idea and a beautiful layout with the din. Thanks sharing
ReplyDeletehttp://www.dianamlarson.blogspot.com
Thank you for the tutorial!!! I have shipping labels in my cupboard... *must finished other project first... must finish other project first...must finish...* OOOOO I found them!!! LOL! Soooo doing it. x
ReplyDeleteLove this! So cute!
ReplyDeleteThis is adorable.. and thanks for the idea..
ReplyDeleteIvette
Well, I'm in favor of anything that uses up scraps. Thanks for the wonderful directions. Your card is adorable. Thanks for playing along at Paper Cutz.
ReplyDeleteThis is so stinkin' cute!
ReplyDeleteWhat a great idea! Thanks for the inspiration ;)
ReplyDeleteI am going to try this. I will shoot you a link to my blog when I am finished. Awesome idea.
ReplyDeleteVery nice great use of colors, thanks so much for joining Mag challenge!
ReplyDeleteHow cool is this?! WOW! How fun, love the dino! Thanks for joining us at 365 cards!
ReplyDeleteVery cute card, love the patch work idea.
ReplyDeleteSoo cute, thanks for the tutorial I am definatley going to try this some time this week!!!
ReplyDeleteI thought I posted to you last night. I am losing my mind! I posted a link to this tutorial on my blog. I hope that is ok! If not let me know and I will remove it: )@
ReplyDeleteYour little dino is sooooo cute!
ReplyDeleteSuch a great idea, thanks for the tutorial!! Love the card :-)
ReplyDeleteThank you for the tutorial. It was grat. Love this card. Would make a great baby card too. One of your newest followers. Blessings!
ReplyDeleteAwesome tutorial.. Love that little dinosaur..
ReplyDeleteMinta
Oh your card is so so cute...Thanks for the little tutorial..love it...so helpful..I just became a follower...TFS
ReplyDeletemary ann
mkeiper72@yahoo.com
Jessica, that is a great idea. I will definitely have to try that sometime. Thanks for sharing.
ReplyDeleteSandy
sweetpeascards.blogspot.com
This is such a great idea and thanks for the step by step..I am so trying this soon.
ReplyDeletehttp://coolbeansbylb.blogspot.com/