Showing posts with label stitched squares inside and out. Show all posts

Tuesday, September 29, 2020

Happy Birthday...{MCT Birthday Palooza}

Good Morning and welcome to another
My Creative Time Birthday Palooza post day!
Today I am sharing a fun birthday card using some of the older MCT stamps and dies
Take a look at my project and let me know what you think....
To make my card I started with a kraft cardstock base, added a layer of white cardstock and then a layer of pretty designer paper from American Crafts.
Next I die cut a square out of the center of my card layers where I ended up placing a clear acetate sheet to make a window in my card.
Using the adorable cloud dies, I added those to the top of the window, lining them up inside the square.
Using the balloon dies, I added 2, popped up onto the front of my card using matching designer paper.
With some matching twine, I added bows to both balloons.
Finally for the sentiment, I used the a Strip sentiment die and the stamp from the Especially for you set. The sentiment was then popped up onto the balloon.
A few random enamel dots and my card is complete.

MCT Products Used:

So there is my completed card. I hope you like it!!
As always, thanks for stopping by my blog!
Make sure to check out what the rest of the DT made over on the
 

Tuesday, August 18, 2020

MCT 103rd New Release Sneak Day 1

Good Morning and welcome to the 103rd NEW RELEASE sneak week!
Miss Emma has some awesome new stamps and dies that I know you are all going to LOVE!
For Day 1 the DT is showcasing the beautiful stamp/die sets
Lot's of Greetings
Fun Bubble Dies
Take a look at my inspiration and let me know what you think...
For my inspiration today I made a cute Halloween card!
I started with a kraft cardstock base, added a layer of white cardstock and then my fun pattern paper die cut using the Rectangular Frame Die.
Next I used the Stitched Squares Inside & Out set to make the openings for those adorable pumpkins.
The Pumpkins were die cut using the Spooky & Creepy Night set and added into the square cut outs. I did add the green leaves to each pumpkin using the Cute Pumpkin Tag Die set.
Finally the sentiment was stamped onto the new Fun Bubble Dies using the new Lot's of Greetings set.
Some matching emamel dots completed my halloween card.

MCT Products Used:
Lot's of Greetings
Fun Bubble Dies

***Sneak Peek giveaway!***
We will be giving away the sets we are showcasing each day to ONE lucky winner! For example, the set we are showcasing on Wednesday, Emma will announce the winner of that on Thursday & the sets we are showcasing on Thursday, Emma will announce that winner on Friday on my blog! ALL you have to do is leave a comment on each of our blogs! You are NOT required to comment on EVERY SINGLE blog, but the more you comment on, the more chances you have for winning! VERY IMPORTANT, PLEASE leave a way for us to contact you w/your comment just in case "YOU" are the lucky winner! For EXTRA entries, you can spread the word about this release on Facebook, tweet about it OR even instagram it! #mycreativetime! GOOD LUCK EVERYONE & let's start spreading the word!;)

Thanks for stopping by for Day 1 of sneaks!!
Please come back tomorrow for another fun sneak!!
Make sure to check out the rest of the inspiration from the DT over on the
My Creative Time blog!


Thursday, June 20, 2019

MCT 92nd New Release Sneak Day 4....(His & Her Dies}

Good Morning everyone and welcome to Day 4 of sneaks for the
92nd New Release from My Creative Time!
Today is the last day of sneaks before tomorrow's BIG Reveal and Blog Hop!!
We have one more die to showcase today....introducing the
His & Her Dies
which is this releases FREEBIE

take a look at my inspiration and let me know what you think...
Using the new die set, I made a masculine card, because I never have enough made...LOL!
I love these new dies and thought pairing them up with the Save the Date sentiment set worked out perfectly for maybe a graduation card?
To make my card, I started with a kraft cardstock base, added a layer of white cardstock and then die cut the designer paper using the Stitched Rectangular Frame Die.
Moving onto the focal point of my card, I die cut 2 of the Stitched Squares Inside and Out, one in kraft and the other in a matching designer paper from the same pad as my background~ Outfitters by Pink Paislee.
I die cut the mustache in black cardstock, the bow tie in the pattern paper and popped both pieces up onto the smaller of the stitched squares.
The new sentiment fits perfectly onto this square~ Bet Miss Emma did that on purpose...LOL!
To finish my card, I added some enamel dots in coordinating colors.


FREEBIE
Starting tomorrow... Friday,  June 21, 2019 at 8am PST we will be giving away this ADORABLE new "HIS & HER DIES".  This new die will be given to the FIRST 25 shoppers!  If you are one of the 1st 25 shoppers it will automatically be added to your package at the time of packing/shipping.  Once 25 shoppers come through,  this stamp set will be available for purchase! So, if it's available in the store, you are not one of the 25.  No exceptions will be made.  This freebie is not part of the "Bundle" and will be sold separately! 

***Sneak Peek giveaway!***
We will be giving away the sets we are showcasing each day to ONE lucky winner! For example, the set we are showcasing on Wednesday, Emma will announce the winner of that on Thursday & the sets we are showcasing on Thursday, Emma will announce that winner on Friday on my blog! ALL you have to do is leave a comment on each of our blogs! You are NOT required to comment on EVERY SINGLE blog, but the more you comment on, the more chances you have for winning! VERY IMPORTANT, PLEASE leave a way for us to contact you w/your comment just in case "YOU" are the lucky winner! For EXTRA entries, you can spread the word about this release on Facebook, tweet about it OR even instagram it! #mycreativetime! GOOD LUCK EVERYONE & let's start spreading the word!;)

Thanks for stopping by for Day 4 of sneaks!!
Please come back tomorrow for the BIG Reveal and Blog Hop!!
Make sure to check out the rest of the inspiration from the DT over on the 


Tuesday, April 17, 2018

MCT 78th New Release Sneak Day 1

Good Morning and welcome to day 1 of sneaks for the
78th New Release from
My Creative Time!!

Today the DT will be showcasing the adorable new set~
You're All Write
Take a look at my inspiration using this set....
Ok now isn't that pencil just the CUTEST!!
I have 2 projects to share using this set. The first one is a mini post it note holder.
I have made these several times in the past and just LOVE how fun they are to make and share. I used the directions for the post it note that can be found HERE on my blog (there are actually a few different kinds of post it note holders found here too)
I added the designer paper from the  Cool Kid paper pack from Crate Paper for the lined paper which was die cut using the Stitched Squares Inside & Out set.
The sentiment is from the new You're All Write set which was stamped right onto the lined paper.
That cutie pencil, also from the You're All Write set was stamped and then paper pieces using scrap cardstock from my stash. He was then popped up onto the from of the post it note holder. 
A mini pen and a matching post it note pad completed my project and it is now ready to give!!
My other project is a small tag that I added to a skinny clear bag of pencils. 
The tag, from the Chunky Stitched Tag Die was die cut using the same lined paper. I stamped the sentiment, also from the set You're All Write onto the tag.
I stamped the mini pencil cutie onto some white cardstock and then I colored him using my prismacolor pencils.
The tag was attached to the skinny bag using some Totally White Trendy Twine.

***Sneak Peek giveaway!***
We will be giving away the sets we are showcasing each day to ONE lucky winner! For example, the set we are showcasing on Wednesday, Emma will announce the winner of that on Thursday & the sets we are showcasing on Thursday, Emma will announce that winner on Friday on my blog! ALL you have to do is leave a comment on each of our blogs! You are NOT required to comment on EVERY SINGLE blog, but the more you comment on, the more chances you have for winning! VERY IMPORTANT, PLEASE leave a way for us to contact you w/your comment just in case "YOU" are the lucky winner! For EXTRA entries, you can spread the word about this release on Facebook, tweet about it OR even instagram it! #mycreativetime! GOOD LUCK EVERYONE & let's start spreading the word!;)


Thanks for stopping by for Day 1! Please come back tomorrow for another fun sneak!!
Make sure to check out the rest of the inspiration from the DT over on the
My Creative Time blog!

Wednesday, March 14, 2018

MCT 77th New Release Sneak Day 1

Good Morning and welcome to day 1 of sneaks for the
77th New Release from My Creative Time!!

Today the DT will be showcasing 2 new sets~
Tulip Frame Die
Springtime Smiles

And for my project I made a card for my MIL for her birthday.
Take a look and let me know what you think....
The new Tulip Frame Die is so pretty and perfect to make and send those spring time cards!
I used the die and layered the frame with several different colors of cardstock, purple for the frame, 3 shades of purple for the tulips and green for the stems.
Once the frame was die cut, I did add another frame around the outside using kraft cardstock and the Stitched Squares Inside and Out
The whole frame was layered onto a piece of designer paper that I die cut using the Stitched Rectangular Frame Die set, layered on white cardstock and then mounted on a kraft cardstock base.
The sentiment stamped inside the frame and some matching enamel dots completed my card.

***Sneak Peek giveaway!***
We will be giving away the sets we are showcasing each day to ONE lucky winner! For example, the set we are showcasing on Wednesday, Emma will announce the winner of that on Thursday & the sets we are showcasing on Thursday, Emma will announce that winner on Friday on my blog! ALL you have to do is leave a comment on each of our blogs! You are NOT required to comment on EVERY SINGLE blog, but the more you comment on, the more chances you have for winning! VERY IMPORTANT, PLEASE leave a way for us to contact you w/your comment just in case "YOU" are the lucky winner! For EXTRA entries, you can spread the word about this release on Facebook, tweet about it OR even instagram it! #mycreativetime! GOOD LUCK EVERYONE & let's start spreading the word!

Thanks for stopping by for Day 1! Please come back tomorrow for another fun sneak!!
Make sure to check out the rest of the inspiration from the DT over on the
My Creative Time blog!

Wednesday, January 10, 2018

Just a litte love note.....{MCT Whatever Wednesday}

Good Morning and welcome to another
Whatever Wednesday with My Creative Time!
What did you think of the new I Adore You Kit that was released on Friday? 
Pretty awesome and perfect for Valentines Day right!!
If you missed the release and blog hop, you can always head back to my blog post and check out my project as well as the rest of the DT's inspiration.

For my project today, I used the new I Adore You Kit...a sentiment stamp and a die to make a Valentine's Day Post it note holder.
Take a look and let me know what you think.....
To make this post it note holder, I started with a piece of kraft cardstock that I cut/score to the following dimensions--7 3/8 x 3 1/4 then score at 3 1/8, 3 1/2 and 3 7/8
I added a layer of white cardstock and then die cut a piece of pattern paper with the Stitched Squares Inside & Out set.
Using the new heart die from the I Adore You set, I cut it out 2 times, once in white cardstock and again in a matching pattern paper so I could layer the 2 onto the front of the note holder.
For the sentiment, I used the Vintage Stitched Label Die and sized it down to fit the sentiment.
A cute mini pen completed my project!

As always I appreciate you stopping by and checking out my project!
For more inspiration, please head on over to the 

Have a GREAT hump day!!

Friday, April 21, 2017

MCT 66th New Release BIG Reveal & Blog Hop

Welcome to the 66th New Release from 
 This has been such an AWESOME week of  amazing inspiration from the DT~ don't you think???
But there is one more day of projects with so lets get started....

You should be coming from the VERY talented
but if you are just stopping in, make sure to head back to the start~ the AMAZING 
You are not going to want to miss a thing!

For my project, I get to showcase the following set~
GRAD NIGHT
and here is the card I made using this set....
I used lots of MCT stamps and dies for this graduation card. It is always fun to grab older sets to mix in with the new releases!!

To make my card I started with a kraft cardstock base, added a layer of white cardstock and then die cut the designer paper using the largest of the Stitched Rectangular Frame dies.
Next I die cut 2 of the Stitched Squares Inside and Out, layered them and stamped the sentiment from the new release set~ Grad Night.
Next I die cut the 2017 using the numbers from the Stitched 4x6 Journal Die, adhered those to the squares and then die cut the grad cap from the new Grad Night Set
To finish my card, I added a few banners from the Ribbon End Banners set and some random enamel dots.

Now for the entire release.....


"FREEBIE DIE"
Starting THIS Friday, April 21st, 2017 @ 8am PST ~ Our "Freebie" for this release is this PRETTY “Watering Can” die. It will be given to the FIRST 75 shoppers! If you are one of the 1st 75 shoppers it will be automatically added to your package at the time of packaging/shipping. Once 75 shoppers come through, this die set will be available for purchase. So, if it’s for sale in the store, you are not one of the 75. No exceptions will be made. This freebie set is not a part of the “bundle” and will be sold separately!

***BLOG HOP GIVEAWAY***
For our blog hop giveaway, Emma is giving away a $50 gift card to the "My Creative Time" store to ONE LUCKY winner! ALL you have to do is leave a comment on each of our blogs! You are NOT required to comment on EVERY SINGLE blog, but the more you comment on, the MORE chances you have for winning! VERY IMPORTANT, PLEASE leave a way for us to contact you w/your comment just in case "YOU" are the lucky winner!

***SALE ALERT***
ALSO, DON'T FORGET our sale starts RIGHT NOW here:http://shop.my-creative-time.com/Ne...! Use the code: APR2017 to receive a discount off your entire purchase! This sale applies to "IN-STOCK" items ONLY. This sale will end on Fri, April 28th, 2017 @midnight PST. 

 Well your time with me is up... your next stop along the hop is the super sweet and very talented

Thanks so much for hopping along with us and have a GREAT Friday!!!

Wednesday, January 4, 2017

LOVE Note.....{3D Wednesday w/MCT}

Good Morning and Happy New Year everyone!
I hope you all had a wonderful holiday season! I know it was hard sending my kids back to school after being off for Christmas because we did have a great break but we get to look forward to a trip to Disney in February so that is awesome!

Anyways I am excited to be back for another year with Miss Emma and the My Creative Time DT! She has TONS planned!
Today is 3D Wednesday where the DT shares projects other than cards.
Since Valentine's Day is just around the corner, I made a post it note holder using several MCT stamps and dies...take a lookie and let me know what you think
To make my holder, I followed a YouTube video I found HERE, and used kraft card stock for the base.
I decorated  the top of the holder using designer paper from SN@P! Color Vibe in a pretty pale pink polka dot paper.
Next I die cut the designer paper using the 3" Stitched Squares and stamped that using the "note" stamp from the Fun Notes set.
To finish my post it note holder, I added some mini hearts that were die cut using the Stitched Heart Background set in white, red and pink cardstock.
A cute mini pink pen fits perfectly in the side and this holder is ready to be given to that special valentine :)

Recipe:
My Creative Time~
Stitched Squares Inside and Out
Fun Notes
Stitched Heart Background

I hope you enjoyed my project 
For more inspirational projects make sure to stop by the
My Creative Time blog!

Thanks so much for stopping by today and have a GREAT Hump Day!!!


Tuesday, October 11, 2016

Trick or Treat...{MCT Tag It Tuesday}

Good Morning everyone and welcome to another 
Tag it Tuesday with My Creative Time!!
Since Halloween is fast approaching, I thought I would make a cute treat container that would super fun to give to a trick or treater.
How adorable is this little paint can?
To make my project I took the paint can, filled it with some candy corn and added a cutie pumpkin face to the front using some vinyl.
Next I grabbed the Holiday Tags set and die cut the tag using white and black cardstock. The sentiment was then stamped using the Spooky Time set and attached to the paint can handle with some orange May Arts ribbon.
My project was complete but I felt it was still missing something so I went ahead and added a stem and leaves. The stem is actually the smallest of the Sitched Squares Inside & Out set which I scored and folded to make the stem. Then for the leaves I used the Stitched Pretty Flowers & Leaves Die attaching the leaves to the front of the stem.
Now my project is complete and I think so super adorable!

Recipe
My Creative Time~

Extra's
Vinyl
Small paint can
May Arts Ribbon

I hope you like my project!!!
Make sure you head on over to My Creative Time to see what the rest of the DT made!
I know the inspiration is AWESOME!!!!

Thanks so much for stopping by and have a GREAT Tuesday!!!

Thursday, September 29, 2016

Fun with Stencils.....{MCT Tutorial Thursday}

Good Morning everyone and welcome to another
My Creative Time Tutorial Thursday!!!
I shared a card  here on Monday for MCT's Manly Monday post showing a fun technique using handmade stencils with MCT dies.
I promised to share a tutorial on how I made that card but instead of reproducing that card, I used the same technique and made 2 different mini cards....
Take a look at my finished projects...
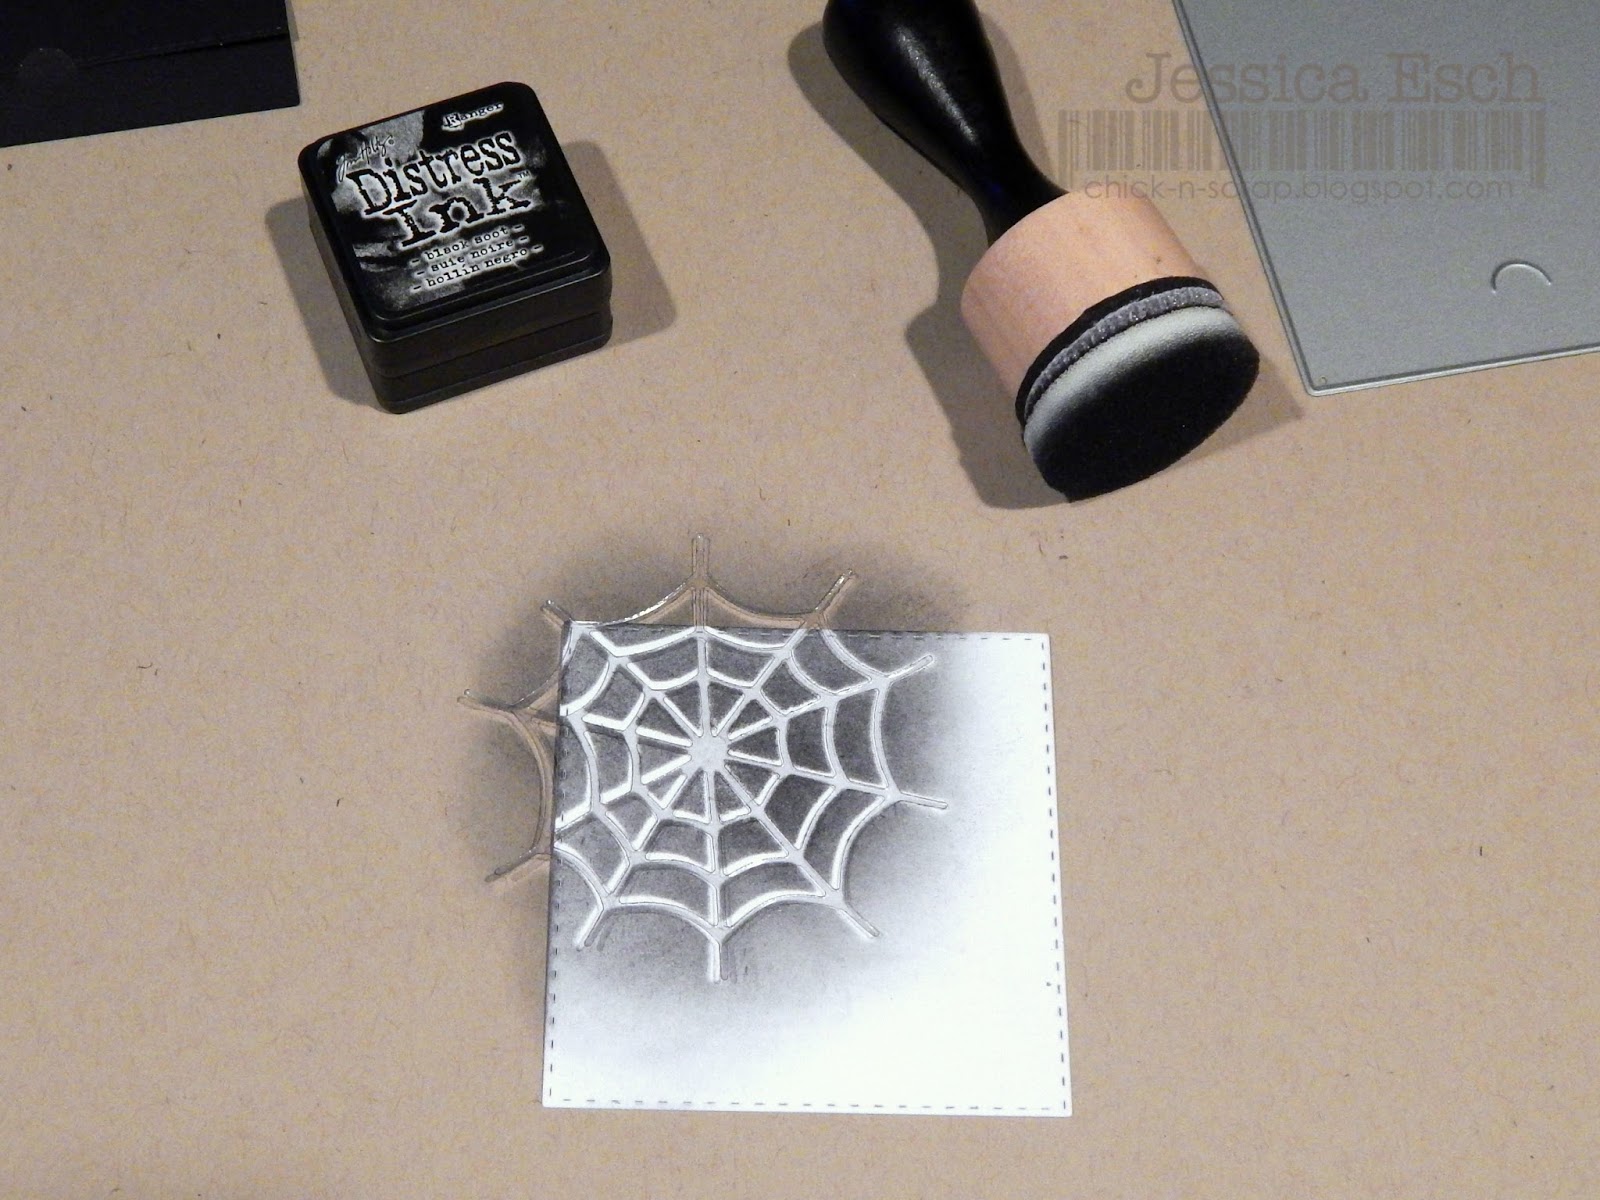
And here is how I made the black and white spider web mini!
I gathered my supplies~ 
and Black Soot Distress Ink
I die cut the spider web out onto a piece of acetate. Loving the details that this die has it makes for a perfect stencil!
Using my ink blending tool and holding onto the stencil, I dabbed and blended and rubbed the tool over the stencil, starting from the center and working out until I got the right look I was going for.  As I blended out I let the ink lighten which gives it the look of a spray painted piece
Once the stencil was pulled off giving the desired look, I re-positioned it onto the other corner and inked it up the exact same way.
To finish my mini card, I stamped my sentiment, added that cutie spider and attached the whole white panel to the front of my Just a Note die cut.
~~~~~~~~~~~~~~~~~~~~~~~~~~~
I did the same technique for my pumpkin card, just changing up the die stencil to use the pumpkin and leaf from the Gobble Gobble set
 Adding  Carved Pumpkin and Mowed Lawn Distress ink
and a bit of  Gathered Twigs Distress ink as well!
When I went to add color for the leaf, I used the actual pumpkin die, the inside of my stencil to cover up the pumpkin so I could contain where the Mowed Lawn Distress Ink went. I wanted to add the color only to the leaf part~not the stem and I didnt want it to over lap the pumpkin
I add the panel to the Just a Note die, stamped my sentiment, and my mini was complete!!
The best part of making these stencils~ you can use them over and over again!!!!
Well I hope you have enjoyed my tutorial and will give this technique a try!

 Want to see more projects?
Make sure you head on over to My Creative Time to see what the rest of the DT made!
I know the inspiration is AWESOME!!!!

Thanks so much for stopping by and have a GREAT day!!