Pages

Thursday, February 26, 2015

MCT Throwback Thursday~"Do Over"

Good Morning and Happy Thursday everyone!
Welcome to "Throwback Thursday~Do Over" with My Creative Time
where we share projects we have redone from the past, using MCT stamps and dies of course.
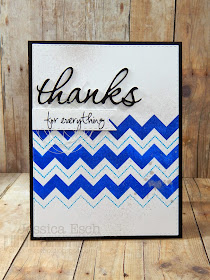
My card today is actually a redo pulling 2 different cards I made not to long ago, combining them using all MCT products and adding a few new techniques I have learned from a few online card classes I have taken. Lets take a look.

Here is my new card. I am really quite impressed with how it turned out and think it would be great to make a few of these to have in my stash. 
Thanks to SEVERAL of my DT sisters for enabling me, I ordered myself a MISTI. OMG this makes stamping so much easier!!!!! I am totally in love with it and can't wait to play with it more :)
Anyways when the idea for my card popped into my head, I used my MISTI to make sure all my chevron stamps lined up perfectly. I actually stamped a few additional card mats to put more of these cards together. I used some new Ranger Dye Inks for the chevrons in beautiful blue colors and once all my chevron lines were stamped I die cut the mat using the Stitched Rectangular Die.
Then for the "thanks" I used the new die set from this last release~Hello Frame Dies and die cut is on a piece of black cardstock layered on some fun foam. That way when I went to add it to my card, there was already a fun popped up look to the piece which also adds some great dimension and texture.
Since using thread is really "in" right now, I added a next of some silver thread to add under my banner sentiment. Again for more added texture~which I just LOVE!
To finish my card off, I took some silver glitter spray and added some splotches. It looks so fun and shimmery in person and matches the silver thread embellishment as well.

Now these are my card redo's. I Linked each of the pictures to the original post incase you want to head back to check them out!
For this card I used the thread and the placement of the Speech Bubble sentiment as the inspiration for my re-do card. Don't forget that this Speech Bubble set is on sale all this month so if it is on your wishlist now is the perfect time to pick it up HERE

And this card is really where my re-do started. I wanted to stamp the chevrons instead of die cutting them like in the above card. 2 very different cards but loving how the new one turned out just as much as this one!

My Creative Time Products Used:

Additional Products Used:
Ranger Die Ink~Caribbean Coast & Blue Ribbon
Silver Thread
Fun Foam
Silver Glitter Mist
Misti

That is all I have for now.... I really hope you have enjoyed my Throwback Thursday "Do Over" card!
Make sure you head on over to My Creative Time to see what the rest of the DT made!
I know the inspiration is AWESOME!!!!
Thanks so much for stopping by and have a GREAT Thursday!!!

Friday, February 20, 2015

MCT 40th New Release Reveal & Blog Hop!

Good Morning 
and 
Welcome to the much anticipated 
40th New Release from My Creative Time!
This week has been so much fun with the DT sharing amazing projects and inspiration! But we have one more day of AWESOME~NESS! 

Now you should be coming from the VERY talented
but if you are just stopping in, make sure to head back to the start~ the AMAZING 
You are not going to want to miss a thing! She really ROCKED this release (well she always does, doesn't she?? Of course!!)

Today I get to showcase this releases FREEBIE stamp set~ 
Wishing You
along with the new set
To a Cute Chickie

All the details on how you can get this set for free is listed at the bottom of my post..but if you have been following all the sneaks this week I am sure you have purchased your new release already before even hopping along....RIGHT?!?! It is another must have for sure!!
*********************
Here is my first project...
For this card I went CAS using the freebie stamp set~Wishing You as the focal point. I started with a piece of kraft cardstock, layered a piece of designer paper (AC Amy Tangerine~Infatuation) die cut using the Stitched Rectangular Frame Dies & More and then stamped the sentiment directly over the heart pattern. For some finishing touches I added a few spring colored enamel dots. I popped the whole front up on some craft foam for alittle extra dimension. I have to say I really love the way this turned out :)

*********************
And here is my next project...
I couldn't help not using the new Milk Carton Die again. I just LOVE it!!! Anyways I stamped the whole die cut milk carton using the Spring Chickens Background. Next I die cut one of the adorable chickies from the new To A Cute Chickie set and colored her using my prismacolor pencils. She was then popped up onto the front of the milk carton but before I did that, I stamped the sentiment and put together the balloon. For the sentiment, I used the "Happy Birthday" from the same set and and masked off the parts around the sentiment "To A Cute Chickie" so I could add that under the birthday sentiment. The balloon is a die cut from the Stitched Party Dies which I adhered to the front of a mini clothes pin.Some hemp twine for the balloon and my milk carton was complete.

Now for all the fun stuff............
"FREEBIE STAMP"
For our "Freebie" stamp for this release, we are giving away this ADORABLE stamp "Wishing You" to the FIRST 150 shoppers! YEP, you heard that right, this stamp will go to the FIRST 150 shoppers for FREE! You do NOT have to add it in your cart, Emma & her shipping crew will automatically include it in your pkg, ONLY to the first 150 shoppers! IF you happen to come through AFTER the 150th shopper, no worries because this stamp will be available for sale! 
Emma, knows there will be questions on whether YOU made the first 150? 
AFTER the 150 shoppers come through, then you will see this set available for PURCHASE along w/the new release items! 
UPDATE ON FREEBIE! 
THE 150TH SHOPPER CAME THROUGH ALREADY! IF your invoice numbers were between 14911 - 15064 then YOU my friends will have this stamp in your pkg! 

If you missed out on this freebie, no worries because it is available for purchase HERE
****Here is another project I made with it (Day 1)****

***BLOG HOP GIVEAWAY***
For our blog hop giveaway, Emma is giving away a $50 gift card to the "My Creative Time" store to ONE LUCKY winner! ALL you have to do is leave a comment on each of our blogs! You are NOT required to comment on EVERY SINGLE blog, but the more you comment on, the MORE chances you have for winning! VERY IMPORTANT, PLEASE leave a way for us to contact you w/your comment just in case "YOU" are the lucky winner! 
 ***SALE ALERT***
ALSO, DON'T FORGET our sale starts RIGHT NOW! Use the code: FEB2015 to receive a discount off your entire purchase! This sale applies to "IN-STOCK" items ONLY. This sale will end on Friday, March 1st @midnight PST. 


And here is the whole release!
****Here is another project I made with this set (Day 1)****

****Here is another project I made with this set (Day 2)****

****Here is another project I made with this set (Day 3)****

****Here is another project I made with this set (Day 4)****

****Here is another project I made with this set (Day 4)****

 BLOG HOP LINE UP
Emma 
Brigit 
Cindy 
Emily 
Jessica
Katie
Kim
Liz
Lucia 
Nikki
Ruthie
Veronica 
Jo PaperDrama 
Vicky

Well your time with me is up... your next stop along the hop is the super sweet and very talented
Katie 
Thanks so much for hopping along with us and have a GREAT Friday!!!

Thursday, February 19, 2015

MCT 40th New Release Sneak Day 4

Good Morning and welcome to Day 4 of sneaks for the new
My Creative Time 40th Release!
This week has been amazing hasn't it? Awesome sneaks of fun new stamps and dies!!!!
Well today you are all going to FLIP!!! I can not wait to show you the new sneaks and then for all you MCT fans to receive these goodies and share your projects!!!

Today the DT will be showcasing projects using the new sets~
Milk Carton Die & Mini Chalkboard Tags
EEEEKKKKK.....yes thats right! An ADORABLE Milk Carton Die!!!
I have 2 projects to share using today's sneaks..so lets take a lookie...
Easter is right around the corner so I thought it would be fun to make this cutie to put into my son's Easter basket.  I used the new Milk Carton Die and some adorable designer paper from My Minds Eye. Then for the sentiment, I die cut the Scallop & Stitched Circles, stamped my sentiment using the All Around Holidays set and then added that cutie bunny die to the center. I couldn't help but add a small pom pom for the bunny tail and closed the milk carton off with a mini clothes pin (that happened to be the PERFECT color to match my designer paper)

For my next Milk Carton, I got into the Mardi Gras festivities! Purple, green and yellow and a whole lot of fun sweet treats fill this! For this one, I used the new Mini Chalkboard Tags (which has another tag die...Whoo Hoo) and stamped my sentiment onto it. Then with some copic markers, I colored in the symbol on the top. I attached the tag to my milk carton with another mini clothes pin, added some Grape Limeade Trendy Twine and embellished with some bling.

 ***Sneak Peek giveaway!***
We will be giving away the sets we are showcasing each day to ONE lucky winner! For example, the set we are showcasing on Wednesday, Emma will announce the winner of that on Thursday & the sets we are showcasing on Thursday, Emma will announce that winner on Friday in her video!
ALL you have to do is leave a comment on each of our blogs! You are NOT required to comment on EVERY SINGLE blog, but the more you comment on, the better chance you have for winning! VERY IMPORTANT, PLEASE leave a way for us to contact you w/your comment just in case "YOU" are the lucky winner! 
For EXTRA entries, you can spread the word about this release on Facebook, tweet about it OR even instagram it! #mycreativetime!
GOOD LUCK EVERYONE & let's start spreading the word!;)
Thanks so much for stopping by today and I will see you all back here tomorrow for the big reveal and Blog Hop!
Make sure to check out the rest of the AMAZING inspiration! You can see it all over on the My Creative Time blog!

Entering this over at:
Simon Says Stamps~Add a Little Texture

Wednesday, February 18, 2015

MCT 40th New Release Sneak Day 3

 Good Morning and welcome to Day 3 of sneaks for the new
My Creative Time 40th Release!
What did you think of yesterdays sneaks? AWESOME right!!!! Well we all have so much more to share with you this week!!!

Today the DT will be showcasing projects using the new set~
Hello Frame Dies
(this awesome set coordinates with the 3x4 Journal Die~Whoo Hoo!!)

Here is the card I made using 1 of the new dies with this set.....
Alittle background for this card before I share the whole thing.
 Here in Western New York there is a Gifted Math Program that is offered through the University At Buffalo for kiddo's entering 7th grade. The program then allows those that get accepted to complete all their Math requirements to graduate High School as well as offering up to 6 College classes for a total of 18+ college credits. There are 16,000 entering 7th graders in the area. From that number 350 students are nominated by their teacher for acceptance. Roughly 200 students will take the exam to qualify for a seat in the program and only 60 students are accepted. 
Now for the very exciting part~ my youngest son Parker was nominated by his math teacher as one of the kiddos recommended for this program!!!! When we got the letter letting us know of his nomination, I was blown away! Yes he is a very good math student...it tends to come very easy for him, BUT for his teacher to pick him out of about 400 students in his grade is AMAZING!!! I know of 4 other students nominated from his school (there may be more, I just don't know how many) so I am beyond PROUD of him!!! He is super excited about this opportunity and now the next step is for him to take the exam which will be in March.
So I guess to make a long story short~I made this card for him to give to his Math teacher. I truly do appreciate everything she has done for him, both in the classroom and as such a positive self esteem motivator for Parker :)
To make my card, I started with a piece of kraft cardstock in which I stamped the Grainy Wood Background onto. Next using some lined designer paper from DCVW, I die cut a piece using the middle sized Stitched Rectangular Frame Die and then added the "paper" side using the Fun Stitched Edges die. Next I used the "thanks" die from the new Hello Frame Dies to start building my sentiment. It was cut using some navy cardstock and then adhered to the lined paper. Next I used the sentiment stamp from the Write On set to add the rest of the sentiment. Finally I used the fun apple die cut from the Love to Learn set and popped that up above the sentiment for some added dimension.
A few staples as my added embellishment and my card is complete.
Since this card is so simple to put together, I plan on making a few more to give to the boy's teachers for Teacher Appreciation.

My Creative Time Products Used: 
Hello Frame Dies (sneak)

Additional Products Used:
DCWV Designer notebook paper
Fun Foam
Staples

 ***Sneak Peek giveaway!***
We will be giving away the sets we are showcasing each day to ONE lucky winner! For example, the set we are showcasing on Wednesday, Emma will announce the winner of that on Thursday & the sets we are showcasing on Thursday, Emma will announce that winner on Friday in her video!
ALL you have to do is leave a comment on each of our blogs! You are NOT required to comment on EVERY SINGLE blog, but the more you comment on, the better chance you have for winning! VERY IMPORTANT, PLEASE leave a way for us to contact you w/your comment just in case "YOU" are the lucky winner! 
For EXTRA entries, you can spread the word about this release on Facebook, tweet about it OR even instagram it! #mycreativetime!
GOOD LUCK EVERYONE & let's start spreading the word!;)
Thanks so much for stopping by today and I will see you all back here tomorrow for day 4!
Make sure to check out the rest of the AMAZING inspiration! You can see it all over on the My Creative Time blog!

Tuesday, February 17, 2015

MCT 40th New Release Sneak Day 2


 Good Morning and welcome to Day 2 of sneaks for the new
My Creative Time 40th Release!
What did you think of yesterdays sneaks? AWESOME right!!!! Well wait until you see the ADORABLE sneaks for today!

Today the DT will be showcasing projects using the new set~
You Had Me at Meow
Here is the card I made using 1 of the new dies with this set.....
Isn't this kitty adorable???? And Emma has the matching dies to go with them. OMG so CUTE and all the added extra's for the kitty's~ well you are going to LOVE them!!!!
So here is how I  made my card. I used designer paper from DCWV that I die cut using the largest Stitched Rectangular Frame Die.I  thought that fun paper was a perfect match to the sentiment. I wanted to add some more to my card so I pulled out the UpperCase Fun Dies, die cut the "X" and "O" and them added some glossy accents to them. 
The sentiment was then stamped onto the Stitched Decorative Banner, cut to fit under the "X" and then added to the front of my card.


Next onto the adorable kitty. I recently took a beginner Prismacolor pencil class and couldn't wait to give my class lesson a try by coloring in this cutie. I used the warm grays for her and then added some pink stickles to her nose and ears. Popped up using some foam square and added to just above the sentiment and my card was complete.

My Creative Time Products Used: 
You Had Me at Meow (sneak)

Additional Products Used:
Prismacolor Pencils
Glossy Accents
DCWV designer paper
Foam pop dots
Stickles

 ***Sneak Peek giveaway!***
We will be giving away the sets we are showcasing each day to ONE lucky winner! For example, the set we are showcasing on Wednesday, Emma will announce the winner of that on Thursday & the sets we are showcasing on Thursday, Emma will announce that winner on Friday in her video!
ALL you have to do is leave a comment on each of our blogs! You are NOT required to comment on EVERY SINGLE blog, but the more you comment on, the better chance you have for winning! VERY IMPORTANT, PLEASE leave a way for us to contact you w/your comment just in case "YOU" are the lucky winner! 
For EXTRA entries, you can spread the word about this release on Facebook, tweet about it OR even instagram it! #mycreativetime!
GOOD LUCK EVERYONE & let's start spreading the word!;)

Thanks so much for stopping by today and I will see you all back here tomorrow for day 3!
Make sure to check out the rest of the AMAZING inspiration! You can see it all over on the My Creative Time blog!

Entering this over at:
Simon Says Stamps~Wednesday Challenge

Monday, February 16, 2015

MCT 40th New Release Sneak Day 1


Good Morning and welcome to Day 1 of sneaks for the new
My Creative Time 40th Release!
Miss Emma has another AMAZING new release and the DT can not wait to share all of our projects with you! We all know you are going to LOVE everything in this release.
So sit back and get ready for a GREAT week of inspiration followed by our blog hop on Friday when we will show you all the entire new release and it will be available for purchase!

Today the DT will be showcasing projects using the new set~
To a Cute Little Chickie 
as well as this releases freebie stamp set~
Wishing You

This is the card I made using the new ADORABLE set! I am beyond excited about this so cute chickie set... 'cause I just LOVE my chickies!!!!
To make my card I used the adorable new chickie die and some wool felt. I didn't stamp on her because I wanted her to be a cute silhouette and have the added texture from the felt bring out her details. She was then added onto a "nest" of silver thread and placed onto an oval die cut. Using the sentiment from the same set, I stamped it onto the vintage label banner die and then embellished my card using 2 hearts, also from this new release set. Some glossy accents on the hearts and popping them up with some foam dots and my card was complete.

My Creative Time Products Used:
To A Cute Little Chickie (sneak)

Additional Products Used:
My Minds Eye~Quilting Bee paper pad
wool felt
Silver thread
Silver Foil tape~Ranger
Pop dots
Glossy Accents

Next for the....
Freebie Stamp Set!

For our "Freebie" stamp for this release, we are giving away this ADORABLE stamp "Wishing You" to the FIRST 150 shoppers! YEP, you heard that right, this stamp will go to the FIRST 150 shoppers for FREE! You do NOT have to add it in your cart, Emma & her shipping crew will automatically include it in your pkg, ONLY to the first 150 shoppers! IF you happen to come through AFTER the 150th shopper, no worries because this stamp will be available for sale! 
Emma, knows there will be questions on whether YOU made the first 150? 
AFTER the 150 shoppers come through, then you will see this set available for PURCHASE along w/the new release items! 

Here is the tag I made using this awesome freebie stamp!

I tried something different for my tag this time. I added a layer of vellum onto the top of the tag and then heat embossed some hearts from the new To a Cute Little 
Chickie set. The vellum softens the look of the sentiment but adds a fun added layer to it as well. Don't you think?

My Creative Time Products Used:
Wishing You (sneak)
To A Cute Little Chickie (sneak)

Additional Products Used:
Vellum
My Minds Eye~My Girl paper pad
White embossing powder
Natural Hemp Twine
May Arts Ribbon

 ***Sneak Peek giveaway!***
We will be giving away the sets we are showcasing each day to ONE lucky winner! For example, the set we are showcasing on Wednesday, Emma will announce the winner of that on Thursday & the sets we are showcasing on Thursday, Emma will announce that winner on Friday in her video!
ALL you have to do is leave a comment on each of our blogs! You are NOT required to comment on EVERY SINGLE blog, but the more you comment on, the better chance you have for winning! VERY IMPORTANT, PLEASE leave a way for us to contact you w/your comment just in case "YOU" are the lucky winner! 
For EXTRA entries, you can spread the word about this release on Facebook, tweet about it OR even instagram it! #mycreativetime!
GOOD LUCK EVERYONE & let's start spreading the word!;)

Thanks so much for stopping by today and I will see you all back here tomorrow for day 2!
Make sure to check out the rest of the AMAZING inspiration! You can see it all over on the My Creative Time blog!

Entering this card into the following challenge:
Simon Says Stamps~Wednesday Challenge

Saturday, February 14, 2015

Trendy Twine~Valentine Secret Cupid

Good Morning and Happy Valentine's Day everyone!!
I am here to share a project that I made for Trendy Twine.
The design team did something a little different this year for Valentine's Day -- Secret Cupid.  Names were assigned to us and no one knew who had who.  We designed a card or tag and sent along a little treat to our assigned DT sister to make her Valentine's Day a bit more happy.  Today we are sharing our projects with you. 

My secret Valentine was DT member Beth and here is what I made for her.

I love the skinny tumbler cup and I just recently added these to my Etsy store.  They make great teacher gifts, friend gifts or of course just a personal on the go cup for yourself. I thought Beth would enjoy this filled with some yummy Valentine's Day chocolate. I decorated her cup with some vinyl and then added my gift tag to the straw.
Here is what the card/tag looks like up close. I used a few My Creative Time products to make this~ 3x3 Fancy Tri-Fold Card for the base and the 100% Sweetness for the sentiment and the Stitched Heart Die. A few added enamel dots and a sweet message inside finished up my tag. To attach it to my cup, I added some Cherry Cupcake Trendy Twine.

Well I hope you have enjoyed my Valentine's Day project. Make sure to stop on by the Trendy Twine Blog to see what the rest of the DT has to share!
Have a GREAT heart day!!!

Monday, February 9, 2015

MCT.....Scrapping the Little Things {January Project Life}

Good Morning and Happy Monday everyone!
Welcome to "Scrapping the Little Things" with My Creative Time
where we share Project Life, Smash book or Scrapbook LO's using MCT stamps and dies!

As I mentioned last month when I shared my February Page, I am planning on making a page for every month this year. I am so not a scrapbooker and have realized that as much as I want to do Project Life, I just can not take pictures that are worthy in my eyes to be shared. Well let me rephrase, I can take pictures that look nice when the sun is shining and we are outside. For the life of me I can not take a picture inside that turns out :( and since our wonderful weather here has been nothing but snow you will have to bear with me on today's post. I am working on that and hope to take at least a basic photography class sometime in the near future. So with that said, I apologize for the poor picture of my January page! 
***my frustrated picture taking rant is over...LOL***
  
My son Parker went ice skating with his buddy Tyler a couple of weeks ago. Tyler's mom snapped these pictures with her phone to send to me.  It was Parker's first time ever on ice skates and she got some great pictures of the boys. 
They have their own ice skating rink in their backyard...how fun right? Alittle dusk time skate/hockey game :)
So I found these new Simple Stories PL pages. They have 2 larger 4x4 slots and then 4 smaller 2x2 slots. They work perfectly with the 4x4 Journal Die + More set from My Creative Time!!! Let's take a closer look at what I did for my page.

For this 2x2 square, I used the 4X4 Journal Die + More set to die cut the cute little square.  To make it more like a journal spot, I stamped the "paper" using one of the stamps from the Get Schooled stamp set. I stamped the lines in black and then added the red lines which is also part of that set. I knew this was going to be my "date" section so using the Type Calendar stamp set, I stamped the month and the year in blue Tim Holtz ink. To finish this off, I used the medium sized snow flake from the Winter Flake Dies set and then added a big silver sparkle enamel dot to the center.

 I just LOVE this picture! Parker is all ready to play some hockey (that is when he could stay up on his feet...LOL) For this part, I again used the 4x4 Journal Die + More for the picture and then used the adorable larger banner from the Stitched Decorative Banners set for the sentiment. I couldn't resist using this sentiment from Winter Cheer...its perfect for this picture! Another snowflake and enamel dot and this was done!

My final picture is of these adorable ice skates I used, again from the Winter Cheer set. I made them more like hockey skates, die cutting them in black rather than white. Then for some fun added detail, I used some silver thread and made a nest behind the skates.

My Creative Time Products Used:

That is all I have for now.... I really hope you have enjoyed my PL page!
Make sure you head on over to My Creative Time to see what the rest of the DT made!
I know the inspiration is AWESOME!!!!
Thanks so much for stopping by and have a GREAT Monday!!!

Tuesday, February 3, 2015

MCT Stamp/Die of the Month~ Fun Speech Bubbles & Dies

Good Morning Everyone!!!
Today the MCT DT is  featuring another
 "My FAVORITE stamp OR die of the Month!  

This month we are featuring another of my  FAVE sets 
"Fun Speech Bubbles Stamp Set".
 If this set  has been on your wish list, you can pick this set up here at a discount price: http://shop.my-creative-time.com/Stamp-and-Die-Kits_c31.htm?page=all
This set will be on sale for the entire month of February! 
The sale will end on February 28th, 2015 @ 12:00am PST! 

Here is the card I made to share for today.... I am in need of some masculine cards and thought this one would be perfect!
My friend Amy of Tsurata Designs posted this card last week and I was inspired by her card design for mine. To put together my card, I used the Stitched Rectangular Frame Die for the card mat, cutting one in the designer star pattern paper and a smaller piece using the matching mustard color paper. I layered the pieces together and then stamped my sentiment from the Fun Variety on the Inside & Out stamp set. Next I used the matching die to the speech bubble sentiment and stamped it using memento tuxedo black ink. 

Before adding the "Yay" speech bubble to my card, I added some of the "newest trendy" in card making~ some gold thread behind it in a random nest :) It is adhered to the card using some foam tape and then for some added reinforcement, I placed some white enamel dots on it.
This card was both so much fun to make and very easy to put together. I will be using this card LO again for more projects. I LOVE the way this turned out!

My Creative Time Products Used:
Fun Speech Bubbles Stamp Set
Fun Variety on the Inside & Out
Stitched Rectangular Frame Dies & More

Other Products Used:
Boy oh Boy paper pad~ Carta Bella
White card stock
Enamel Dots
gold thread
fun foam

That is all I have for now.
Make sure you head on over to My Creative Time to see what the rest of the DT made!
I know the inspiration is AWESOME!!!!

Thanks so much for stopping by and have a GREAT Tuesday!!!