Pages

Wednesday, July 30, 2014

MCT 34th Release July Sneak Peek Day #3

Good Morning and 
Welcome to Day 3 of sneaks for the new
My Creative Time 34th  Release!
Hasn't this been such an AWESOME release so far?? Just wait..there is more to come!!!!

Today the DT  will be showcasing projects using the new sets~
Alpha Pack & Trio Stitched Banners  

***Sneak Peek giveaway!***
We will be giving away the sets we are showcasing each day to ONE lucky winner! For example, the set we are showcasing on Wednesday, Emma will announce the winner of that on Thursday & the sets we are showcasing on Thursday, Emma will announce that winner on Fridayin her video!
ALL you have to do is leave a comment on each of our blogs! You are NOTrequired to comment on EVERY SINGLE blog, but the more you comment on, the better chance you have for winning! 
VERY IMPORTANT, PLEASE leave a way for us to contact you w/your comment just in case "YOU" are the lucky winner! 
For EXTRA entries, you can spread the word about this release on Facebook, tweet about it OR even instagram it! #mycreativetime!
GOOD LUCK EVERYONE & let's start spreading the word!;)

And here is the card I made..
I used the current Deconstructed Sketch seen HERE for my card design and matched several older MCT stamps and dies with the new releases we are showcasing today! Always fun to go back into my MCT stash of goodness and play :)
Anyways here is how I made my card for today. Yeah I know it is a bit away from Halloween, but when I saw the sketch, I wanted to use the What a View! die with the new Alpha Pack! LOVE how those letters fit inside the viewfinder!!!
Ok back to how I put this together. I started with some kraft cardstock as my card base and added a layer of MME designer paper. Then using one of my FAVORITE dies~ the 3x4 Journal die, I layered my focal piece onto that. Again I used the What a View! die and stamped "boo" into the open spaces. Next I die cut 2 different Stitched Chevy Dies, the largest of the new Trio Stitched Banners and the adorable ghost from the Stitched Spooky Ghost Die set all in pattern papers from the MME Mischievous paper pack. Then I stamped my sentiment onto the banner die using the Fright Night stamp set and popped the banner up onto the front of my card. I also added some pop dots to the ghost and die cut an extra "eye" to add to the ghosts mouth :)
Some enamel dots to the corners of my journal die and my card was completed!

My Creative Time Products Used:
Trio Stitched Banners (New Release)
Alpha Pack(New Release)

Other Products Used:
My Minds Eye~ Mischievous
Pop Dots
Enamel Dots

Thanks so much for stopping by today and I will see you all tomorrow for Day 4 of sneaks!!!
Don't forget to check out what the rest of the DT has made!
They can all be found on the My Creative Time Blog
and as always the inspiration is AMAZING!!!

Tuesday, July 29, 2014

Treats Just for You....{Trendy Twine DT} {Post 2}

Good Morning everyone!!!

~ If you are looking for Day 2 of sneaks for My Creative Time please click on the picture~


It is my DT day over on the Trendy Twine Blog and I am sharing a fun treat that would make a great party favor using 3 of the spotlighted colors that the DT has been showcasing all month~ Strawberry Cupcake, Twisted Lime and Blue Berry!

Here is my sneak.... 
I would love it if you headed over to the Trendy Twine Blog to see my full project,
 I think you will LOVE it :)

My Creative Time Products Used:
Trendy Twine Products Used:

Don't forget the Original Six Trendy Twine's are on sale this month for $6.95 for the sampler 
or get each spool for $7.95 each. What a DEAL!!
New to Trendy Twine??? Check out the other places where we share our projects .....
Trendy Twine Blog~ HERE
and the
Trendy Twine Facebook page~ HERE
Don't forget to visit the 
 new and improved, packed with tons of product
 Store HERE

Thanks so much for stopping by and have a GREAT Tuesday!

MCT 34th Release July Sneak Peek Day #2

Good Morning and 
Welcome to Day 2 of sneaks for the new
My Creative Time 34th  Release!

Today the DT  will be showcasing projects using the new sets~
Geo Borders, Stitched Decorative Banners and DREAM BIGGER

***Sneak Peek giveaway!***
We will be giving away the sets we are showcasing each day to ONE lucky winner! For example, the set we are showcasing on Wednesday, Emma will announce the winner of that on Thursday & the sets we are showcasing on Thursday, Emma will announce that winner on Fridayin her video!
ALL you have to do is leave a comment on each of our blogs! You are NOT required to comment on EVERY SINGLE blog, but the more you comment on, the better chance you have for winning! 
VERY IMPORTANT, PLEASE leave a way for us to contact you w/your comment just in case "YOU" are the lucky winner! 
For EXTRA entries, you can spread the word about this release on Facebook, tweet about it OR even instagram it! #mycreativetime!
GOOD LUCK EVERYONE & let's start spreading the word!;)
  
And here is the card I made..
This card was not how it started out...it was a work in progress that changed multiple times before becoming this and I have to say that I LOVE the way it turned out! (hope you do too!)
Anyways here is how I made this....I used all my papers from the MME Cut & Paste paper pack. I stamped the sentiment, which is the new Dream Bigger stamp ~that will the freebie offered to the first 100 customers~ in the center of my journal die.
 I then went and embellished around that focal point adding several different things. First I lightly stamped one of the Geo Border stamps up the side of the journal die. Then using one of the Fun Stitched Edges die, I added that onto the side of the journal die. To hold that all onto my card mat, I added some machine stitching to the upper right hand corner of the journal die. 
Next I die cut the arrow from the 4x4 Journal Die + More set and popped it up facing the sentiment. A few randomly placed enamel dots along that side give a bit more dimension and fun to the card.
Finally I used the Stitched Pretty Flowers & Leaves Die to cut out a small flower. Before adding it to my card, I stamped all the pieces with another Geo Border to add some more texture to those pieces. 

My Creative Time Products Used:
Dream Bigger (New Release)
Geo Borders (New Release)

Other Products Used:
My Minds Eye~Cut & Paste paper pad
Enamel Dots
Sewing Machine
Peeled Paint & Antique Linen Distress Ink
Pop Dots

So what do you think??? Not like my typical card design but like I said earlier...I so LOVE this card!!!

Thanks so much for stopping by today and I will see you all tomorrow for Day 3 of sneaks!!!
Don't forget to check out what the rest of the DT has made!
They can all be found on the My Creative Time Blog
and as always the inspiration is AMAZING!!!

Monday, July 28, 2014

You are Sweet....Face Day w/PKS {Post #2}

~If you are looking for the My Creative Time Day 1 of sneaks please click the picture~

Good Morning Everyone!!!
Hope you all had a GREAT weekend!!!
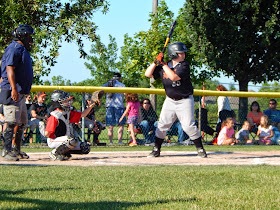
The weather was beautiful here, perfect for my son Parker's travel baseball tournament as well as my son Casey's travel soccer tournament! Whew...what a busy weekend but non the less AWESOME! Both boys played their hearts out!

Here are some pictures from the weekend......

Parker catching~ the position he LOVES to play the most! And to brag just a little....he is VERY good at it too :)
 
He is so cute when he is at bat :) LOVE that little slugger!!! He even pitched too. Here is he warming up with the hubs!

And here is my oldest...Casey had the Lancaster Soccer Tournament Fri~Sun. I was able to catch a few pictures from the game on Sat. He is the goalie so he is pictured in the center :)
 Such a fun bunch of kids!

And here he is in net. They have one more game on Tuesday and then the season is over for them. It sure went by FAST!!

**********************
Now onto my projects....
It is my turn to share a "Face Day" project over on the Peachy Keen Stamps Blog 

I made a set of "Just Because" cards and I have to say I think they are super cute :)
I wanted to keep the cards on the simple side to really showcase the adorable PK faces and sentiment.  I used pattern paper from Lawn Fawn as by color theme...and I just realized while writing up my post that these fit into the current PKS Color 
Challenge that is going on right now (there is also a sketch that you could use as well....come on everyone~I would LOVE to see you play along!)

Here is how I made these.....
 I started my cards out using a Kraft Cardstock base and layering both white cardstock and pattern paper. For a little more detail, I did run the mats through my sewing machine for a nice even border.
Next I used my Silhouette and a Miss Kate Cuttable file~Cute Popsicles to cut out 4 different Popsicles in different colors. I hid the face that comes with the file so I could add my PKS face.
Once all the layers were cut and assembled, I stamped on my PK face using one of my favorite sets~ PK~1300 Sweet & Innocent Face Assortment.

I just love adding a cute PKS face to my projects! I highlighted the face a bit by adding chalk to their cheeks and some white gel pen freckles. I also colored in their eyes with my white gel pen as well.
Once all the faces were stamped, I added some matching Trendy Twine in Twisted Lime, Blue Berry, Strawberry Cupcake and Lemon Tart to each of the Popsicle sticks. Popped them up onto my card fronts and my cards were completed.
One thing I forgot to mention...before adding my Popsicles, I did stamp my sentiment. This one comes from the PK 1398~Circus Treats set.


So there is my Face Day project for today. I really hope you have enjoyed these cuties!

Peachy Keen Stamps Used~

Other Products Used~
Let's Polka~Lawn Fawn designer paper
Miss Kate Cuttables
chalk, pop dots
sewing machine

Thanks so much for stopping by and have a GREAT Monday!!

MCT 34th Release July Sneak Peek Day #1

Good Morning and 
Welcome to Day 1 of sneaks for the new
My Creative Time 34th  Release!

Today the DT  will be  showcasing projects using the new 
Grainy Background, Fun Letter Background & Large Cloud Bubble Die

***Sneak Peek giveaway!***
We will be giving away the sets we are showcasing each day to ONE lucky winner! For example, the set we are showcasing on Wednesday, Emma will announce the winner of that on Thursday & the sets we are showcasing on Thursday, Emma will announce that winner on Fridayin her video!
ALL you have to do is leave a comment on each of our blogs! You are NOT required to comment on EVERY SINGLE blog, but the more you comment on, the better chance you have for winning! 
VERY IMPORTANT, PLEASE leave a way for us to contact you w/your comment just in case "YOU" are the lucky winner! 
For EXTRA entries, you can spread the word about this release on Facebook, tweet about it OR even instagram it! #mycreativetime!
GOOD LUCK EVERYONE & let's start spreading the word!;)
  
And here is the card I made..
I made this card by stamping the Grainy Background stamp onto some kraft cardstock.
Then using the Large Cloud Bubble Die, I die cut it 2 times, once in white cardstock and then again in black cardstock so that I could layer it to give it a fun shadowy look.
Next I stamped my sentiment and die cut the adorable pup, both using the Loyal Friends stamp set. Once everything was assembled on the stamped mat, I added a May Arts bow and glued the whole mat onto my card base. Finally to finish my card off, I added some randomly placed hearts using the Stitched Heart Layering Die

My Creative Time Products Used:
Grainy Background (New Release)
Large Cloud Bubble Die (New Release)

Other Products Used:
May Arts Ribbon
White, Black and Kraft Cardstock
Pop Dots

Thanks so much for stopping by today and I will see you all tomorrow for Day 2 of sneaks!!!
Don't forget to check out what the rest of the DT has made!
They can all be found on the My Creative Time Blog
and as always the inspiration is AMAZING!!!

Wednesday, July 23, 2014

SVG vs Pieceables...{PKS Tutorial}

Good morning everyone!
I am on the Peachy Keen Stamps blog today with a tutorial on using 
Peachy Keen Stamps SVG'S and the new Peachy Keen Stamps Pieceables!
~ SVG~

~Pieceable~

You are probably thinking....well we know the difference just by looking at your pictures.
And I am sure you are right BUT we have had several people ask questions since the new pieceables were released last week, so I am hoping that all your questions are answered with this post....check it out over on the blog HERE
 I would love to see what you think of my tutorial....
Comments make me happy :)

Thanks for stopping by today and have a GREAT hump day!

Tuesday, July 22, 2014

Bee Happy! ....{MCT Tag it Tuesday}

Good Morning and welcome to 
Tag it Tuesday w/My Creative Time!
 
Today the DT will be sharing  tags following the sketch below and using of course all the great My Creative Time! stamps and dies that Miss Emma has to offer.
Here is the tag I made....I just LOVE how it turned out!
If you are a follower of my blog, you know by now that I have 2 boys, so whenever I can make something girly I take that opportunity :) So my inspiration for my tag came from a recent blog hop I did. 
After completing the hop, I received these adorable HK files designed by Annie from SVG Cutting Files. The HK bee was perfect to use with all the AWESOME MCT bee stamps and dies that were released last month.
I started my tag out using one of the Tag Dies and layering parts of the Stitched Honey Comb Die on the side. I used white and yellow designer paper to fill in a few of the honey comb sections, leaving the rest open. 
After cutting and assembling the HK file, I did leave out the lady bug that was part of HK and added the 3 mini flowers~ MCT Stitched Button Dies in its place. To cover the button sections of the flowers, I used the tiny center of the flower from the Stitched Pretty Flowers & Leaves Dies.
Next I layers 2 rows of the Stitched Grass Die placing HK in between the layers. Then for the sentiment, I shortened the banner die from the Just Simply Live set to fit the Bee Happy sentiment.
I finished the sentiment off with a Totally Lemon Trendy Twine bow and then added more Totally Lemon, Totally Sky and Totally Black Trendy Twine to the top of my tag.

My Creative Time Products Used:

Other Products Used:
Lets Polka designer paper~Lawn Fawn
Hello Kitty~ SVG Cutting Files (freebie from hop)
Vellum 

Well that it all I have to share :)
  Make sure you head on over to My Creative Time to see what the rest of the Design Team has created.
Thanks for stopping by and have a GREAT Tuesday!

Wednesday, July 16, 2014

Thank You Soccer Cards...{Whatever Wednesday w/MCT}

Good Morning and welcome to 
My Creative Time's~Whatever Wednesday.
This is the DT's day where we can create whatever we want, a card, LO, 3D or altered item using MCT stamps and dies!

Soccer season for my oldest is winding down and I needed to make a few coaches Thank You cards, so using all MCT goodies and inspiration from a pin I found HERE I made these....
I used the largest Stitched Hexy Die and diecut several in white and black cardstock. Then laying them out in the soccer pattern, I attached them to a red cardstock base. Seeing that the teams colors are red and black, I wanted that extra hint of color added which can be seen in between each of the hexy dies.
To finish my card off, I added some Totally Red Trendy Twine (which is in production now and should be released soon!) and my sentiment which was stamped onto the Stitched Oval Die.

My Creative Time Products Used:
Other Products Used:
Black, White and Red cardstock

So what do you think????? Hoping the coaches like these!!!!
Make sure you head on over to My Creative Time to see what the rest of the DT made!
I know the inspiration is AWESOME!!!!

Tuesday, July 15, 2014

All the World Loves a Snowman....{PKS Challenge 14~11}

Morning everyone!
Welcome to another fun Peachy Keen Stamps Challenge!!!!
For this challenge you can pick either the sketch OR the Photo/Color picture OR combine them both! A little twist to what we were doing with our challenges :) Also instead of having 2 weeks to enter, you now have a month to enter! So get playing with your PKS and enter to win an AWESOME prize!
So for my card, I used the sketch and pulled 2 colors from the color pallet to come up with this card....hope you like it!
I so LOVE the  July release stamps and just had to make another card using the new Snow Hugs Snowman. I did a a lot of paper piecing for her hat, scarf and gloves and then popped her up onto a circle die cut from MCT.
For the "starburst" part of my card, I watched this video on youtube for the idea on how go about making it. I have never made one of these cards, so this video was perfect.To add more details to my card, I did go ahead and add some machine stitching in between each of the pattern papers. I really like the way that turned out!
I finished my card off with some Trendy Twine and the sentiment, also from  the new Snow Hugs Snowman stamp set.

Supplies Used:
Peachy Keen Stamps~ Snow Hugs Snowman
My Creative Time~Bunch of Fun Circle Dies
Trendy Twine~ Stormy
Lawn Fawn Designer Paper, chalk, copic markers, sewing machine

I hope you have enjoyed my card and will play along with the new challenge!!
You can find out all the details by heading over to the Peachy Keen Blog as well as see the inspiration from the other DT members!

Thanks so much for stopping by and have a GREAT day!!!

Monday, July 14, 2014

Christmas in July FB Hop w/ PKS & KDB

Hello everyone and welcome to our KaDoodle Bug Designs and Peachy Keen Stamps Christmas in July Facebook hop! 
It is beginning to look at lot like Christmas around here despite the warm summer weather. We have some amazing projects to share with you all week long from both of our very talented design teams. As well as some great prizes to be won! Our hop will start each day right here on the KaDoodle Bug Designs fan page.

Even though this is a Facebook hop, I wanted to share my project on my blog to give the complete supply list I used and to share a few additional up close pictures.
So here is my project! A fun 3D treat box with lots of Peachy Keen Stamps and an adorable file from Kadoodle Bug Designs.


Here is a close-up of that cute new PKS face. I used one of the new releases from the Christmas in July Face Assortment. I colored his eye in with a green copic and a white gel pen, added some chalk to his cheeks as well as some more white gel pen highlights. For the reindeer cut, I didn't use the eyes and nose that came with the file, instead I added another PKS face, this one from the Bird Faces and More and then for his nose I used an enamel dot. I also changed up the snowflake, using a MCT die and adding silver chunky glitter to it, then popping it up onto the cut.
Here is the sentiment I used. It is again from a new release! the Musical Elves stamp set. I stamped it onto a MCT die, added another glittery snowflake and then attached it to my bow using a pear pin I picked up from my friend Beckie over at Just B Creative Crazy

Supplies Used:
Peachy Keen Stamps~

Kadoodle Bug Designs ~

My Creative Time Products Used~

Additional Products Used~
DCWV~ The Merry Christmas Stack
3D Snowflake Box (Silhouette Store)
May Arts Ribbon
Chalk, white gel pen, pop dots
enamel dots, pear pin, chunky glitter

Prize list: 
~KaDoodle Bug Designs will be giving away two $25 giftcards 
~Peachy Keen Stamps will be giving away two $25 gift cards 
~Craftin Desert Diva's will be giving away one stamp set 
and 
~Too Cute By Jessica will be giving away one $25 gift card. 
*****To be eligible to win one of these fabulous prizes you will need to like all the fan pages and be sure to leave a comment on each project****

 Since the hop is a week long you will want to come back each day to see all of the amazing projects we have in store for you! 

Head over to the
KaDoodle Bug Designs fan page for the full line up here: https://www.facebook.com/kadoodlebugdesigns

Thanks for stopping in today and make sure to check out this FUN FB hop!!
TONS on adorable projects!!!!
~~~~~~~~~~
Entering this into the following challenges:
My Craft Spot~ Anything but a Card

Thursday, July 10, 2014

"Fishing You a Happy Birthday"...{MCT Designer Challenge}

Morning Everyone! Hope you all are having a great week so far!
Boy is it flying by for me...Another day and it is the weekend!!!! We have a busy one to say the least, my son is playing in a baseball tournament starting tonight and going through Sunday. I have my fingers crossed that we ROCK it!! I know the boys can do it for sure!!!

Anyways I am popping in because it is time for another 
My Creative Time  
Designer Challenge!!!
Today's challenge is to use the photo below for your project...
You can use the water, boat, color palette or all of the above to create anything you want.

I ended up using the color palette AND the water for my inspiration to make a cute birthday card....here it is, hope you like it!!!
For my card, I used an A2 card base and added a layer of grey card stock topped with a piece of designer paper that I added a stitching border to. Using the Make a Splash Die and the circle die from the Lost at Sea set, I went about laying out the design of my card. I wanted to add some seaweed to my "scene" and thought that the leaves from the Stitched Pretty Flower set would be perfect :) Once everything was in place, I used my Cameo to cut out the goldfish, adding a PK face in place of the one in the sil file. I colored in the eyes with my white gel pen and added some orange chalk to his cheeks. He sure is a cutie don't you think?
Finally I added some Totally Natural Trendy Twine and my sentiment, which I stamped onto the oval die piece from the Surprise Pop-Out Card Die

My Creative Time Products Used:

Other Products Used:
That's My Boy Paper Pad (Echo Park)
Gold Fish (Silhouette Store)
sewing machine, white gel pen, chalk, pop dots

So there is my Designer Challenge inspiration. I hope you like my card.
Make sure to head on over to the My Creative Time blog for more inspiration from the rest of the DT and for all the details on linking up your project!
Thanks so much for stopping by and have a GREAT day!